Minecraft Java Resource Pack Creation Guide
Resource Pack Structure
Before we start making a resource pack, I’m going to go over how a resource pack is structured.
Pictured below is the resource pack template I provided the link to earlier:
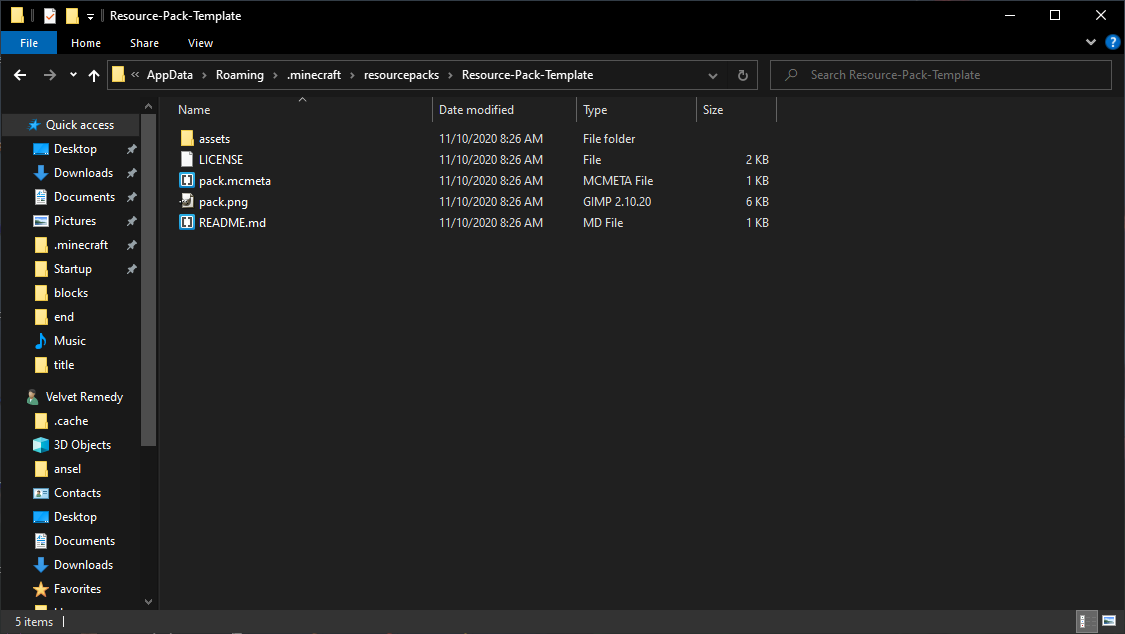
This is the main folder of your resource pack; let's go over the files inside it.
LICENSE - This file is not needed, but is included in all the packs I manage. It lets anyone know this resource pack has this license and in what ways they may use it. You can edit it to be for your pack or delete it entirely.
pack.mcmeta - This file is needed for Minecraft to recognize your texture pack. This tells Minecraft what pack format your pack is (aka what version is it compatible with), what the description of your pack in-game is, and it also tells Minecraft if you have any custom language files (which we’ll get into later).
pack.png - This file is the icon for your pack in the resource pack menu in Minecraft.
README.md - This file is not needed but is included in all my packs to give information about the pack and credit everyone who works on it. This file can be deleted if not desired.
Now let's go one folder deeper into the pack. Pictured below is the assets folder:
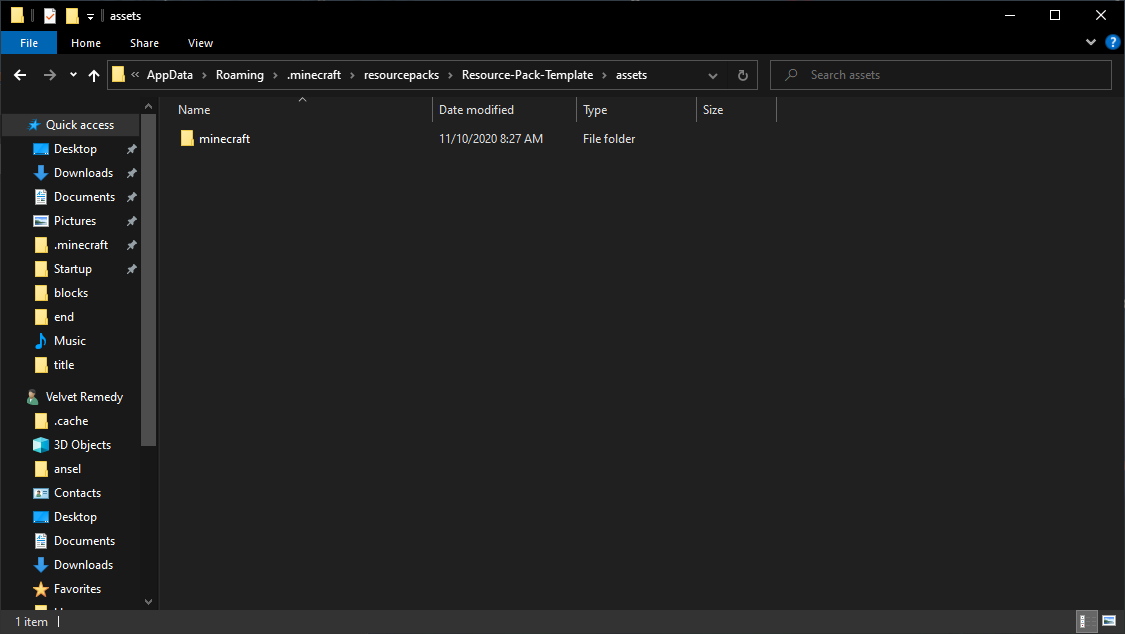
The assets folder holds all the textures for Minecraft. If you want to support Minecraft Realms or any mods, then you add the mod folder to the assets folder. Below is an example:
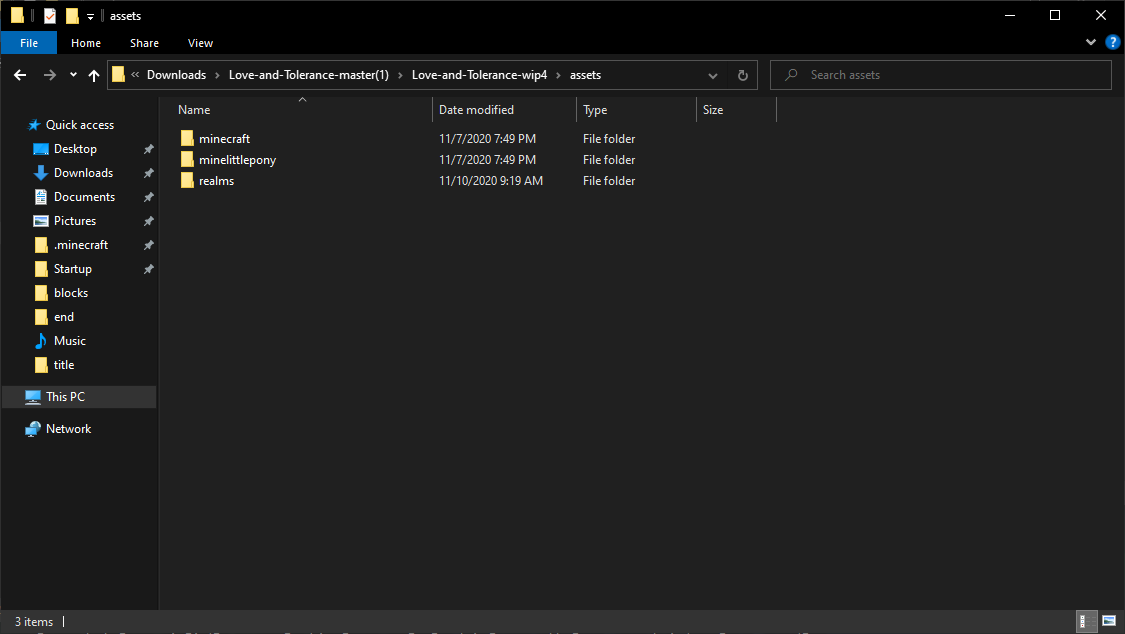
The realms folder holds textures for Minecraft Realms, and the minelittlepony folder is for textures for that mod.
For now, we will only be covering textures for default Minecraft. Let's go one level deeper into the minecraft folder:
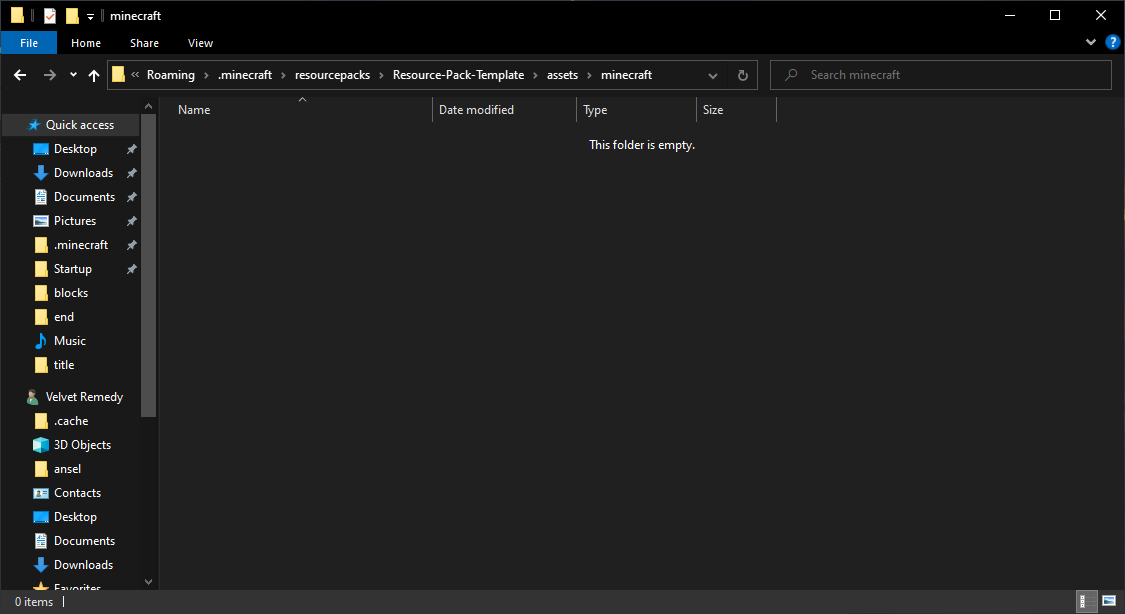
That's right, it's empty. This is where you're going to need to make folders for the areas of minecraft you will want to change.
Let's figure that out by looking at the default minecraft structure:
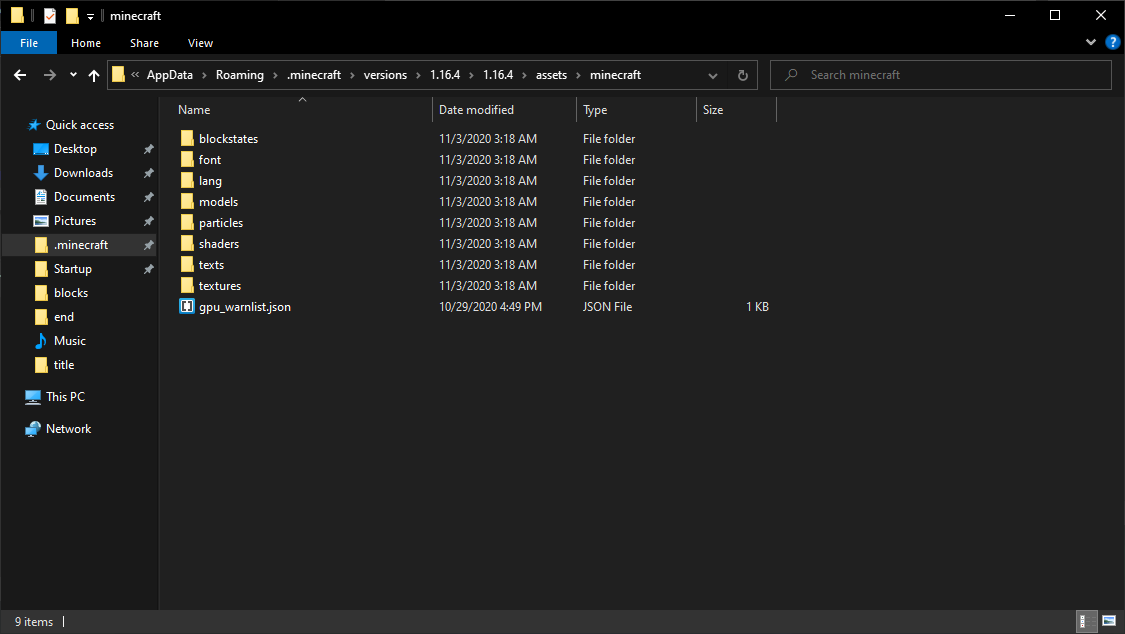
Your resource pack can contain any of these folders. Let's go over them:
blockstates - These point Minecraft to the models used in-game for every block.
font - Contains information about the size and location of each letter in the font. Most font changes happen at the texture level, you probably won't need this folder.
lang - Contains the language files, this is where you put your custom language or edit the default one.
models - These are the in-game models for every item and block, they tell Minecraft what shape it is and what texture to use for each side.
optifine - (not pictured above) This is where you would put files for optifine support like connected textures.
particles - These point Minecraft to the texture file for each particle effect.
shaders - The shaders for the old in-game ‘super secret settings’ button that have since been removed. Not modified by most resource packs.
sounds - (not pictured above) The sounds go into this folder but do not appear when you extract the Minecraft jar file as they are stored separately.
texts - contains the text files for the credits, the end poem, and the title screen splashes.
textures - this is where all the textures are stored, this is where you will do most of your work.
gpu_warnlist.json - This is a default vanilla file you don't need in your texture pack.
Two of these folders have sub folders, we will now go over those.
models:
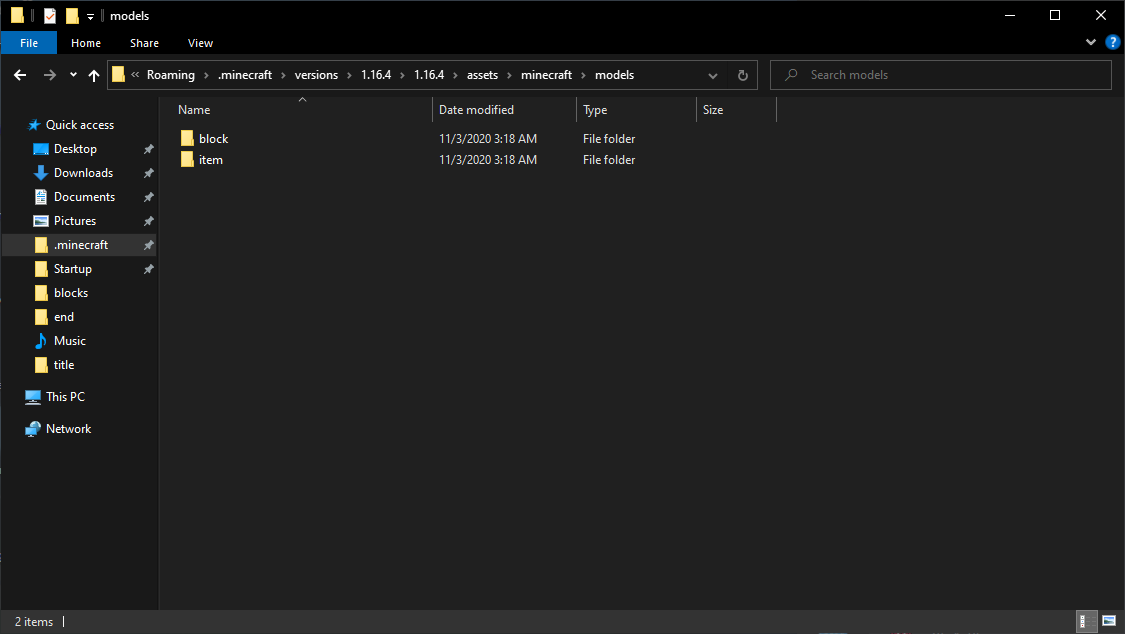
These subfolders are pretty self-explanatory:
blocks - block models go here
items - item models go here
textures:
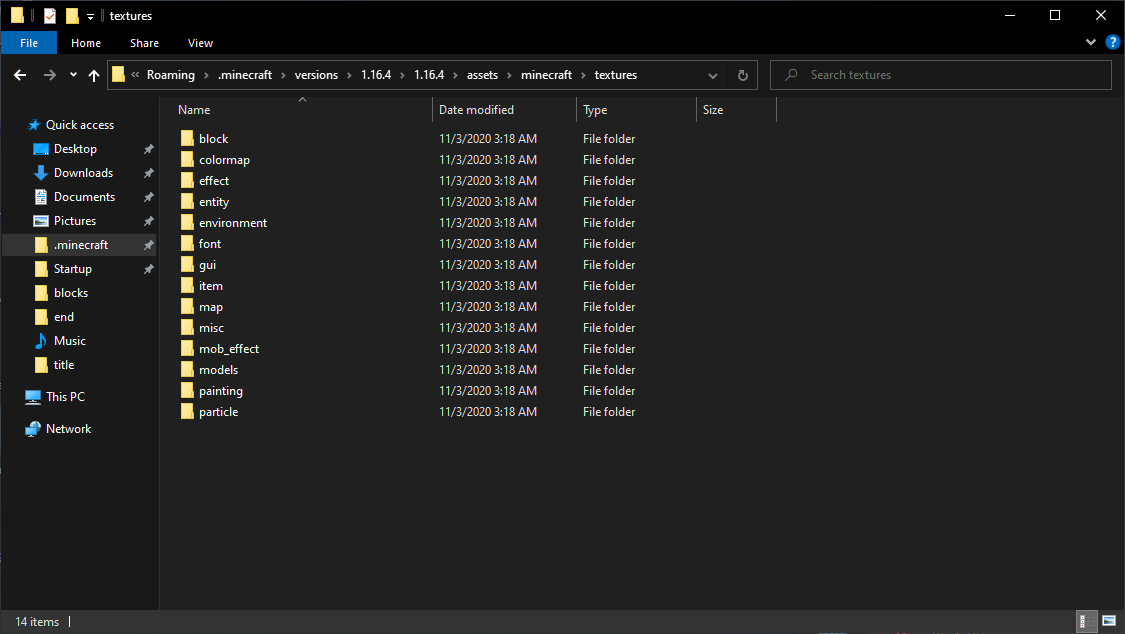
Let's go over the folders in the above image.
block - All the block textures are here. (This is for versions 1.13+; For 1.12.2 and under use blocks)
colormap - The grass and foliage colormaps are here.
effect - Contains the dither texture, which is used in the notch shading effect that has been removed from default Minecraft.
entity - Contains all the mob, NPC, and entity textures, like signs, boats, etc.
environment - Contains the sun, moon, rain, snow, clouds, and end sky textures.
font - Contains the font textures.
gui - Contains all the UI textures, from menus, to the hot bar, containers and more.
item - Contains all the item textures. (This is for versions 1.13+; For 1.12.2 and under use items)
map - Contains the map icons and background textures.
misc - Contains misc textures, from enchantment glint to unknown server & pack.
mob effect - Contains all the status effect textures, like strength & speed.
models - Contains the textures for the armor in the game.
painting - Contains the painting textures.
particle - contains all the particles, like explosions, anger, bubble, etc.
Making a New Pack
Resource Pack Folder
Now that you have a basic understanding of how a texture pack is structured, let's start making one. You're going to want to find your resource pack folder; it can be found at:
| Operating System | Location |
|---|---|
| Windows | %APPDATA%\.minecraft\resourcepacks |
| MacOS | ~/Library/Application Support/minecraft/resourcepacks |
| Linux | ~/.minecraft/resourcepacks |
You can also get to it by clicking Open Pack Folder in Minecraft:
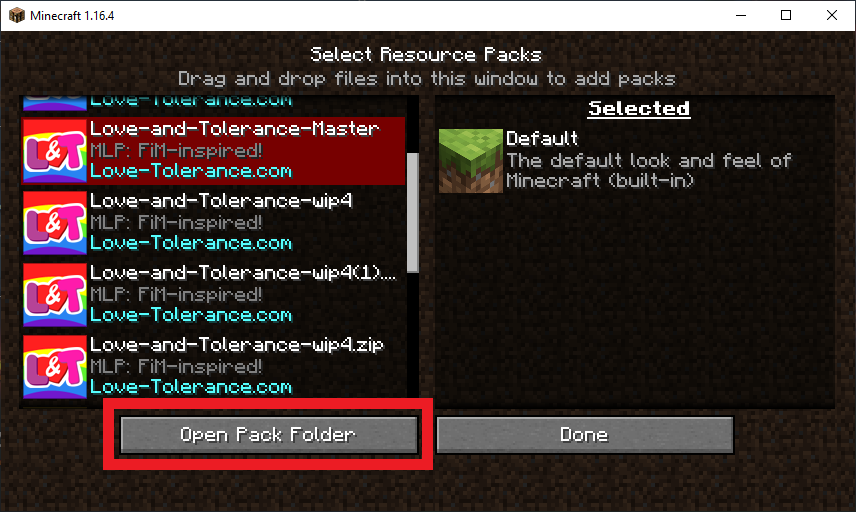
Extracting the .jar File
Once this folder is open, you are going to want to extract the template and copy that folder here:
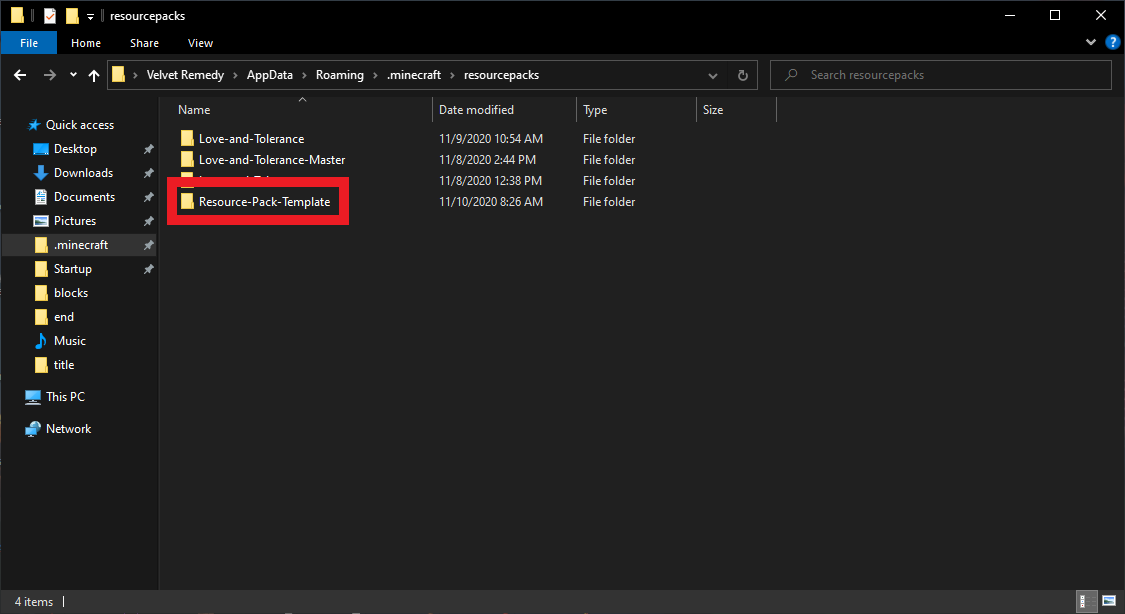
Once it is copied over, you can rename the folder to what you want your resource pack to be named. I recommend you use dashes - or underscores _ rather than spaces, but you don't have to.
Right-click the template folder and click Open in new window. Minimize the old window, as we will come back to it when we are done editing the template.
Inside, the template pack looks like this:

Right-click the LICENSE file and click Open with Brackets or Edit with Notepad++.
Read the license and if you plan on keeping it, change the Copyright at the top in this red box to your resource packs name:

If you are going to use it, save after editing and close Brackets. If you don't want to use the License, delete the file.
Now right-click the pack.mcmeta file and click Open with Brackets.
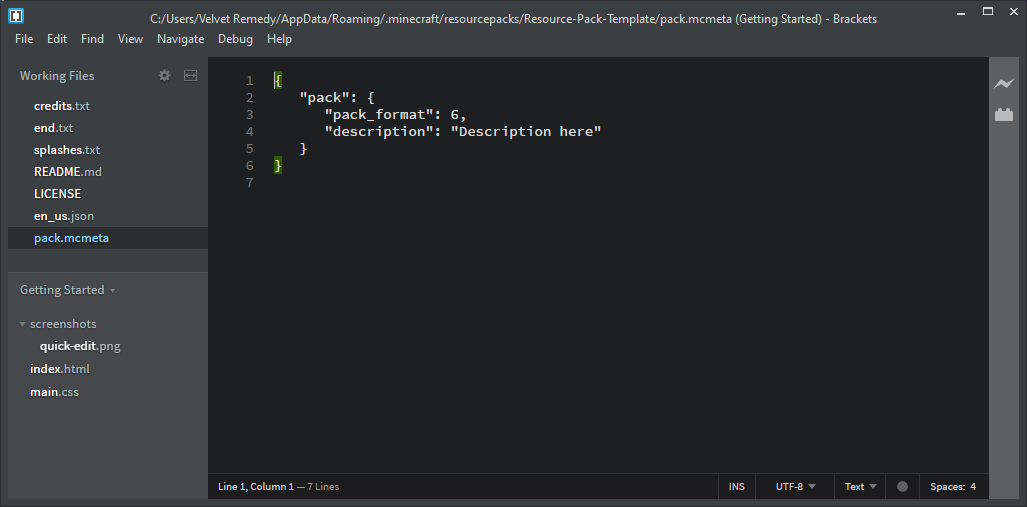
The pack format tells Minecraft what versions this pack will work with:
| Pack Format | Minecraft Versions |
|---|---|
| 1 | 1.6.1 to 1.8.9 |
| 2 | 1.9 to 1.10.2 |
| 3 | 1.11 to 1.12.2 |
| 4 | 1.13 to 1.14.4 |
| 5 | 1.15 to 1.16.1 |
| 6 | 1.16.2 to 1.16.4 |
| 7 | 1.17 to 1.17.1 |
| 8 | 1.18 to 1.18.2 |
| 9 | 1.19 to 1.19.2 |
| 11 | 22w42a to 22w44a |
| 12 | 1.19.3 |
Change this to the version you will be making the pack for.
The description is what appears in the game on the resource pack selection screen, It can be customized with different colors and such. See the link above about formatting codes for how this works.
Once you've made your changes, save and close Brackets.
The last text file in this folder is README.md. If you plan on keeping it, open it in Brackets and edit it to be what you want. I like to have information about the pack and any relevant links for that specific pack and a credits listing everyone who has worked on it. This entire guide has been written in Markdown, here is the raw code. Here is a guide to Markdown. Having a README file is especially useful if you have your resource pack on GitHub, as it is what people see when they look at your repository.
Once you are done with that, go into the assets folder, then into the minecraft folder. Right-click and hover over New then select Folder, name this folder textures like this:
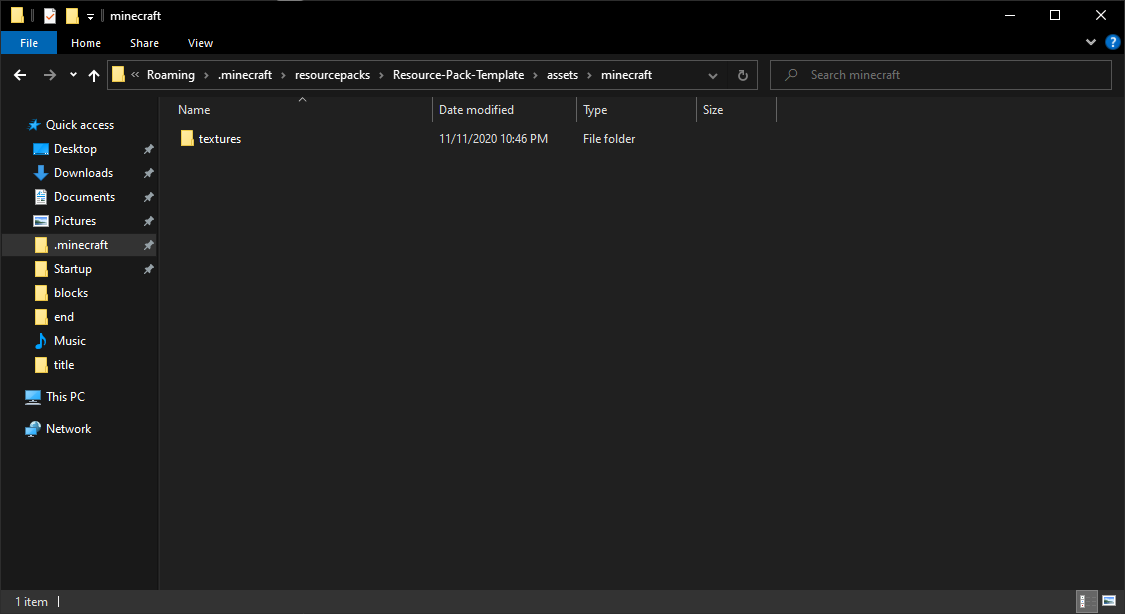
Next, you are going to go into the textures folder and make a new folder inside it, called block, like this:
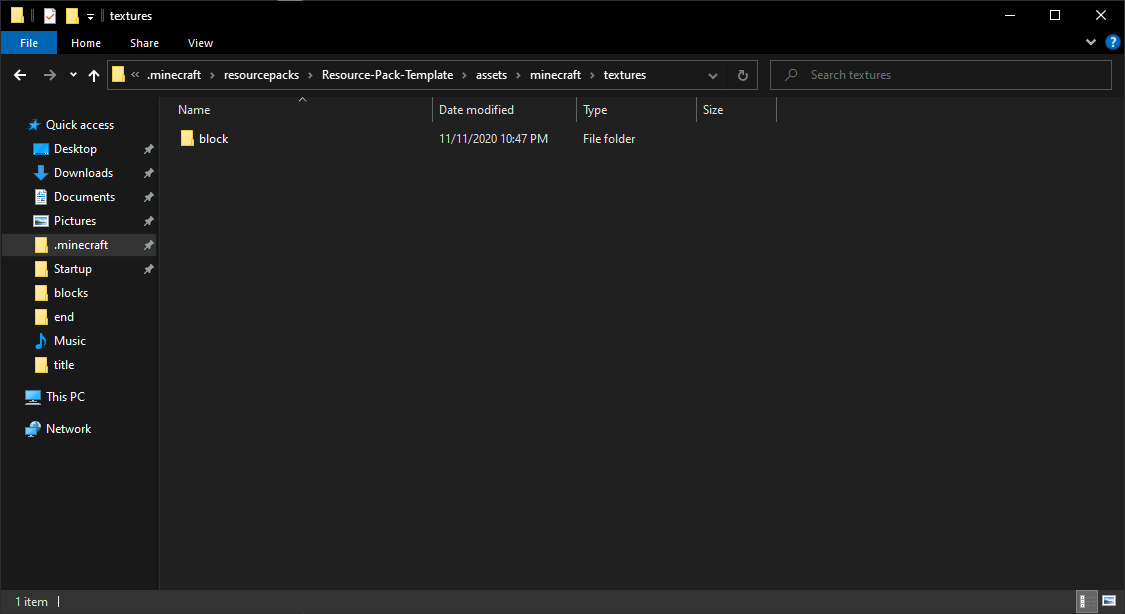
After that, go into the block folder. Now we are going to minimize this window down and go extract the Minecraft .jar file.
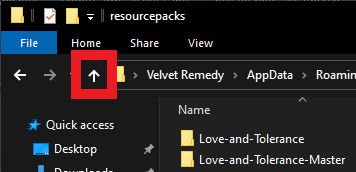
Open up the window you minimized earlier. In the resource pack folder, click the up arrow to get to the .minecraft directory:
Once inside your .minecraft folder, you will want to go into the versions' folder:

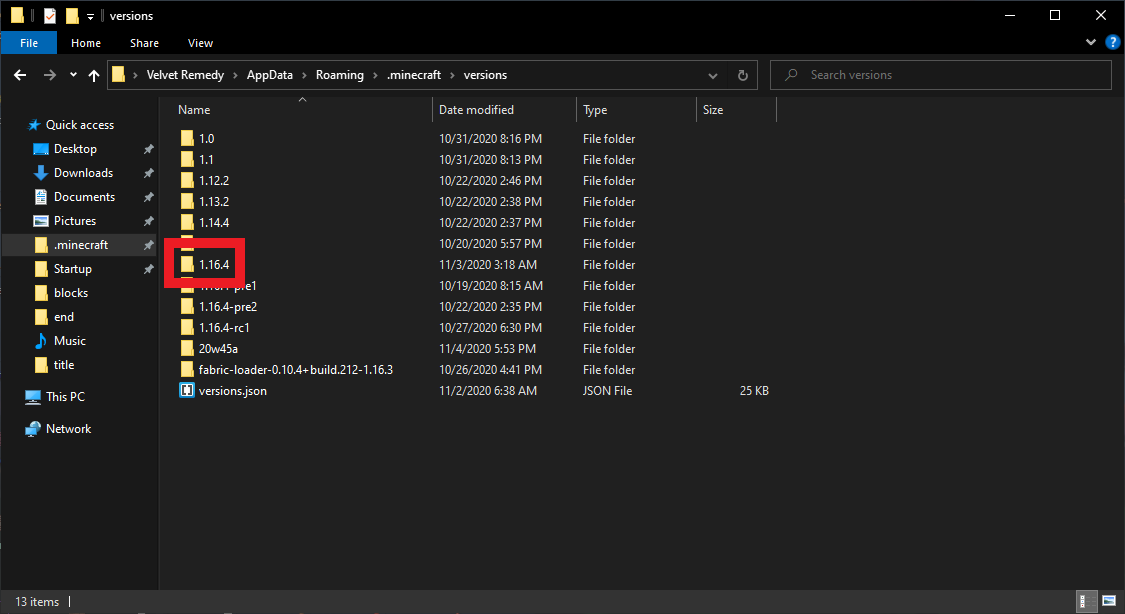
Once inside, you will see a folder for each Minecraft version you have installed. You will want to go into the folder for the version you are making the resource pack for. We will be using 1.16.4 for this guide:
Once inside you are going to see the Minecraft .jar file. This is where all the default assets are for Minecraft:
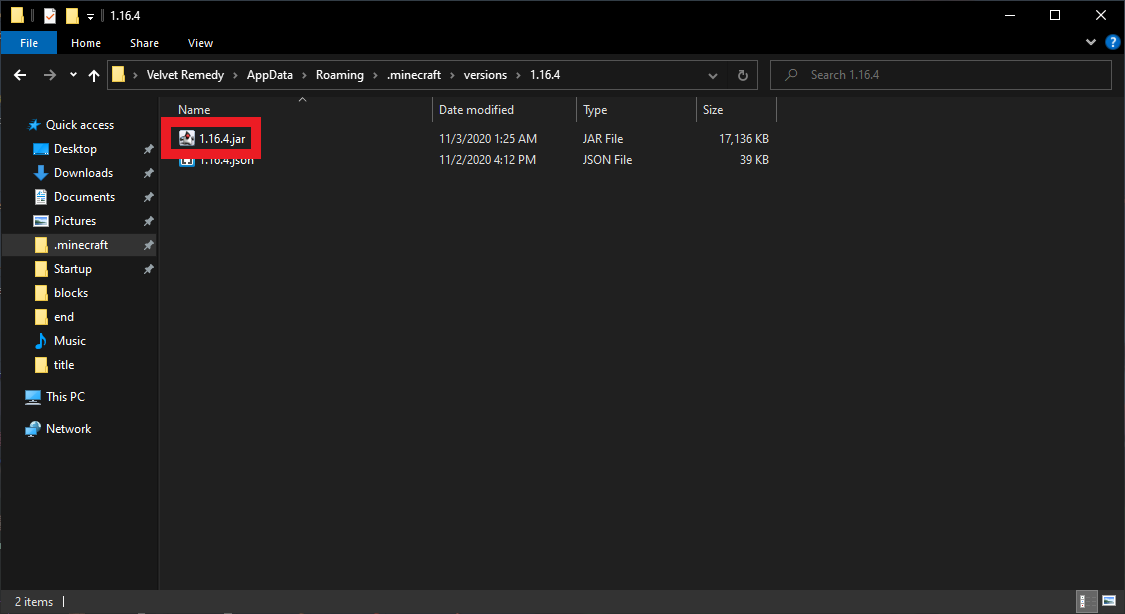
You are going to want to extract it. If using 7-Zip, right-click the .jar file and hover over the 7-Zip submenu, then click Extract to 1.16.4\.
Wait a few seconds for it to finish, then go into the folder it made:
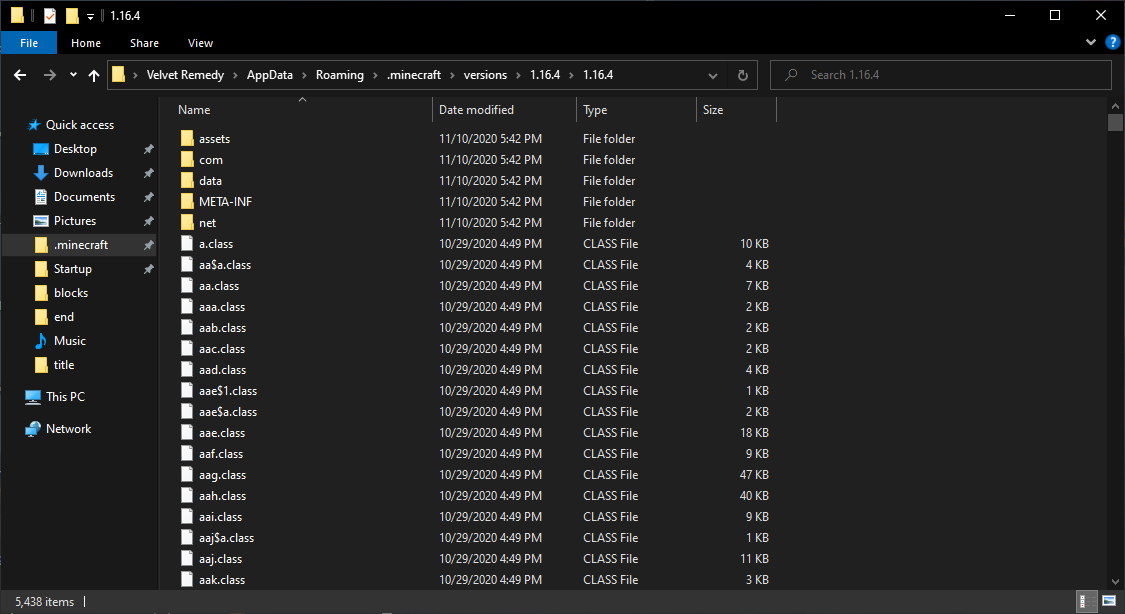
Most of these files are pointless to you. The only thing we care about is the assets folder at the top; go into it:
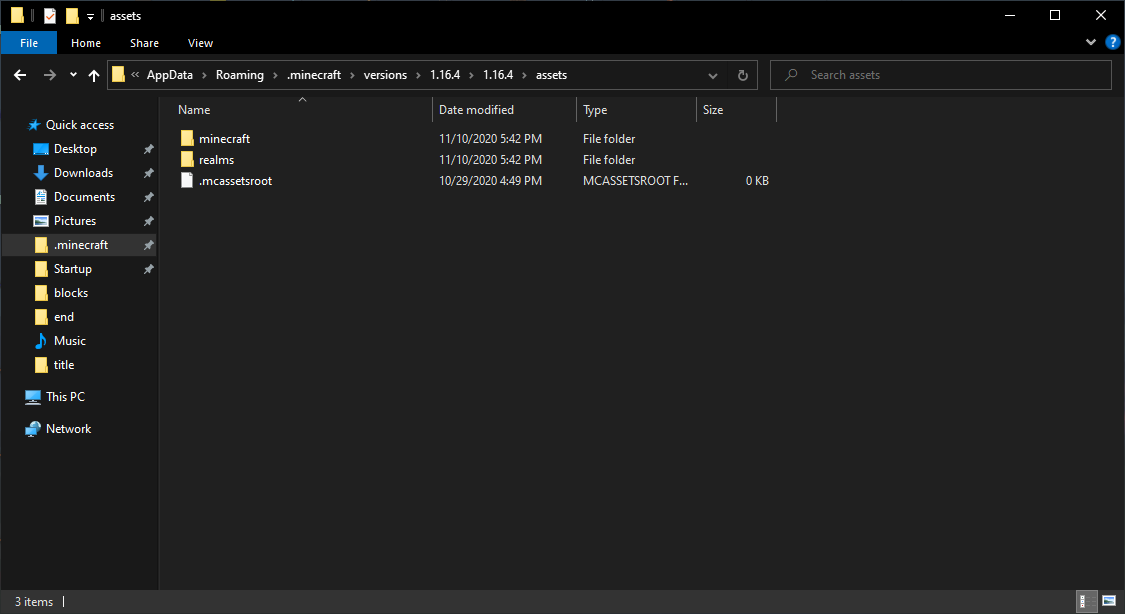
Starting to look familiar? Go into the minecraft folder:

Blocks and Items
Making Your First Texture
Now go into the textures folder:

Next go into the block folder:
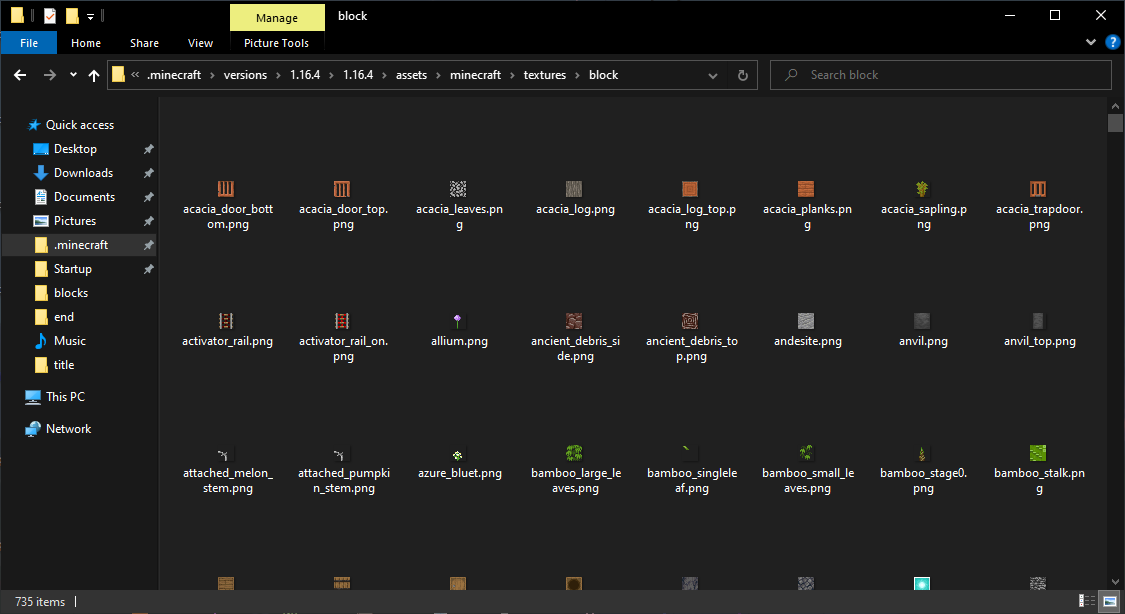
There are a lot of files in here; these are all the default block textures. For now, we are going to search for one block at a time. I’m going to be using stone for this example, but you can use any block you want.
Search for the block you want to make a texture for:
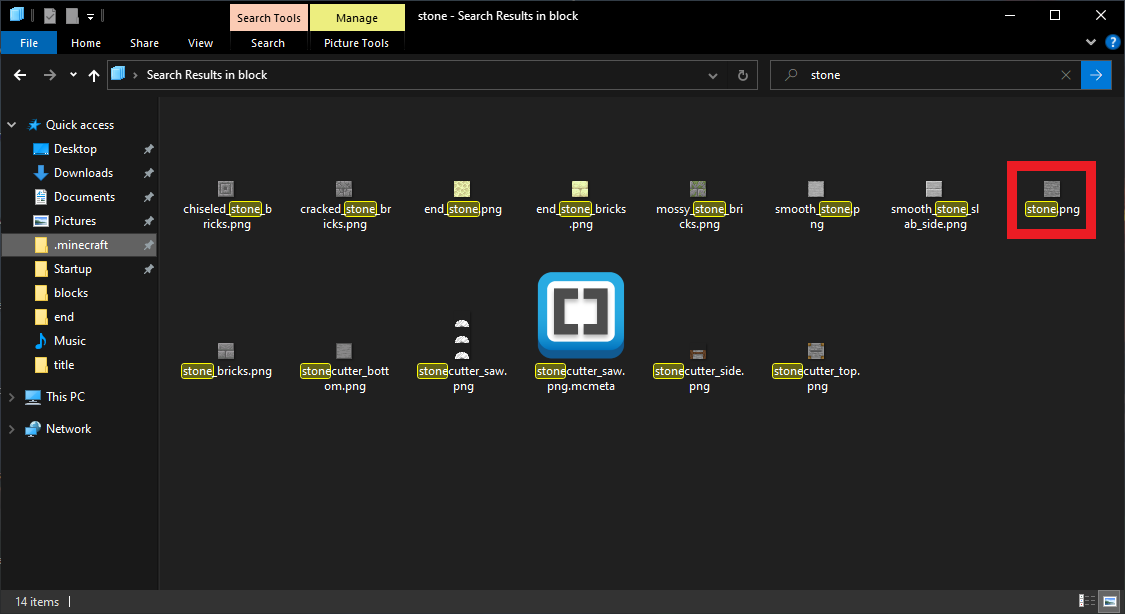
Right-click the image and click copy. Move back to your other window and paste it:
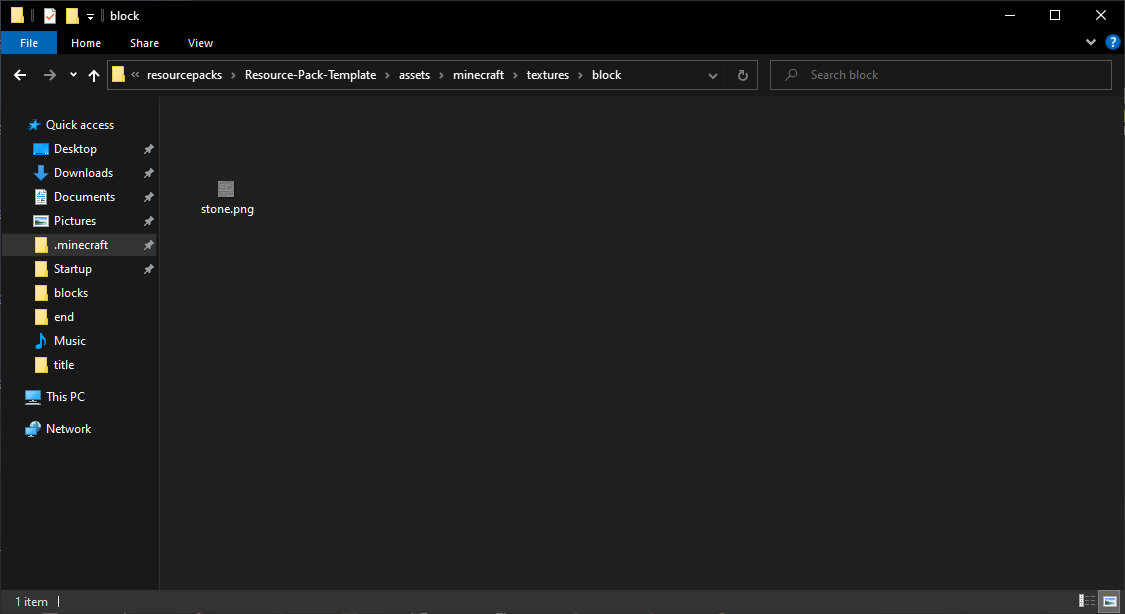
Now right click that copied image, hover over Open with and click GIMP. It will take a few seconds to open up, but you should be met with a screen like this:
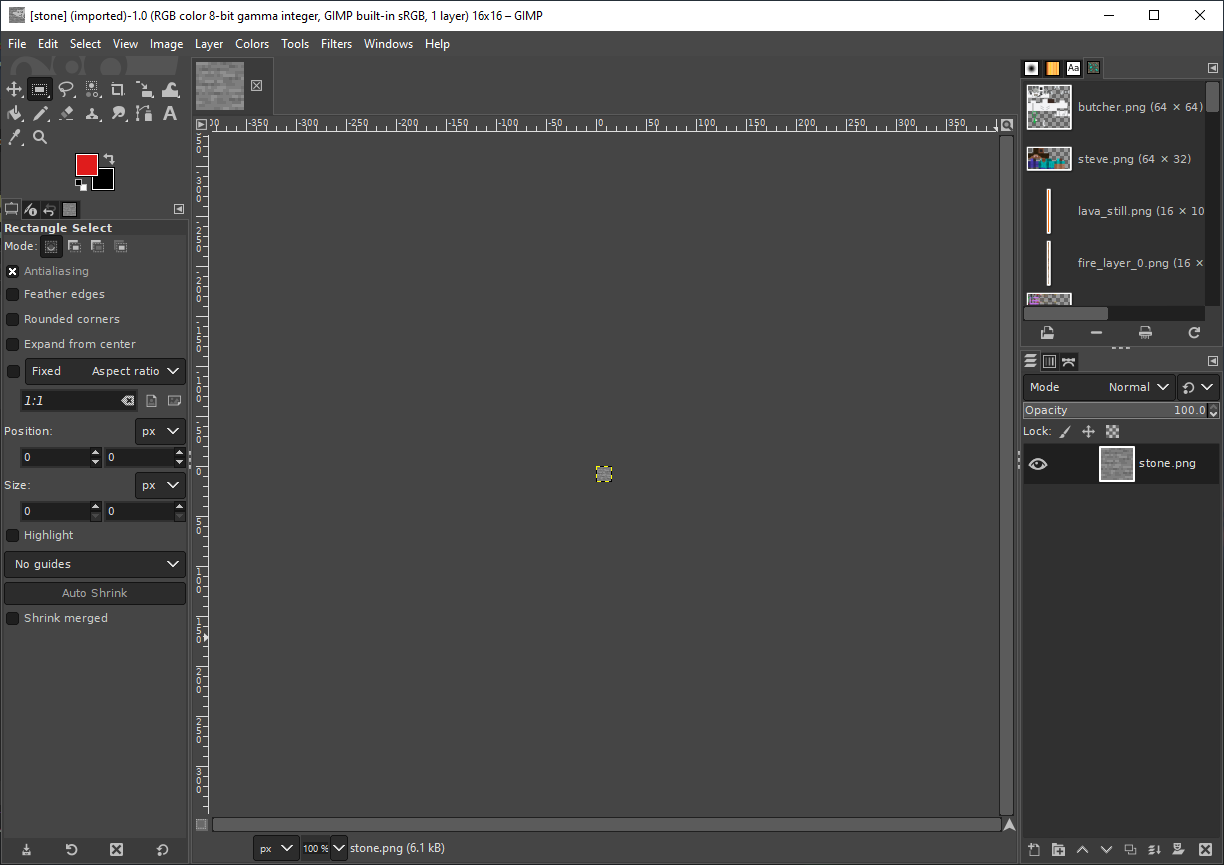
That texture is tiny. Zoom in by holding down Ctrl and scrolling the mouse wheel in:
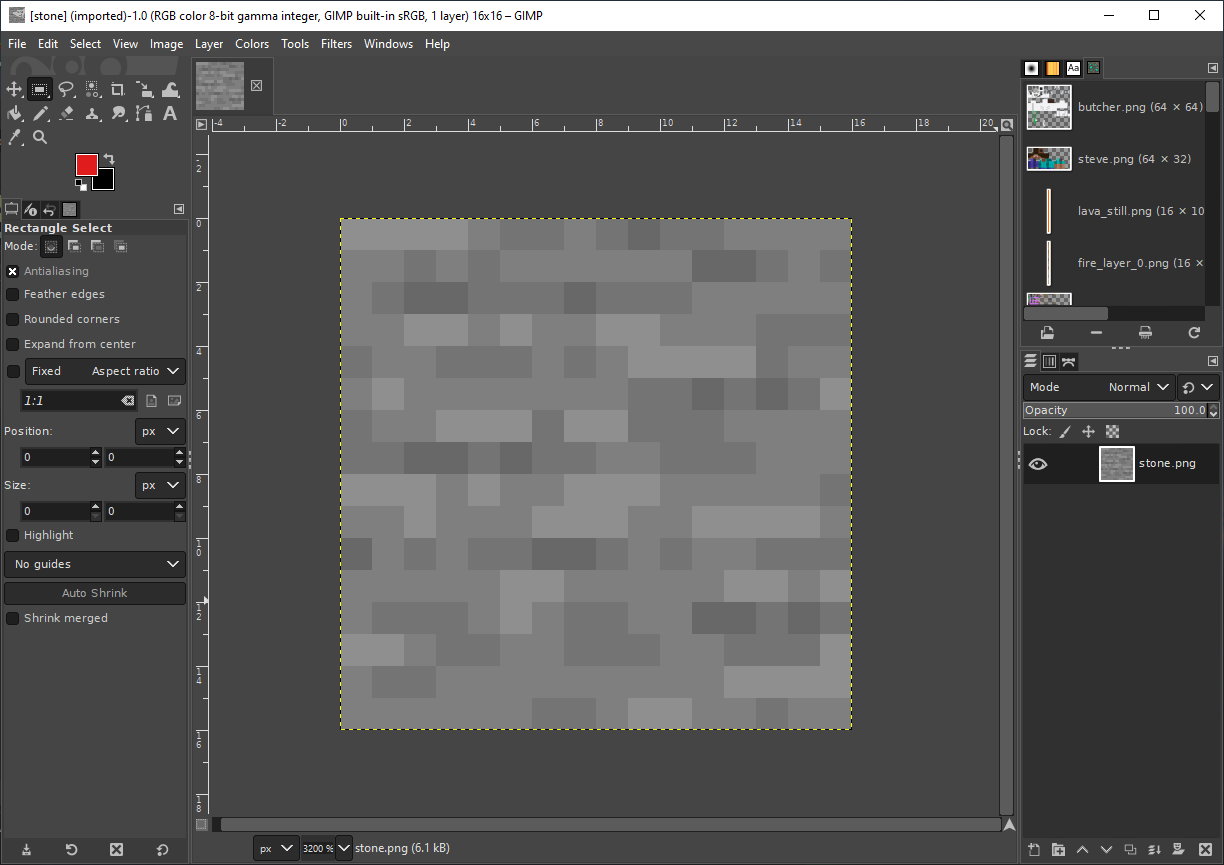
Now that's better. Hit the N key to switch the selected tool to the Pencil. On the left side of the screen you will see a menu of tool options; you will want to set size to 1:
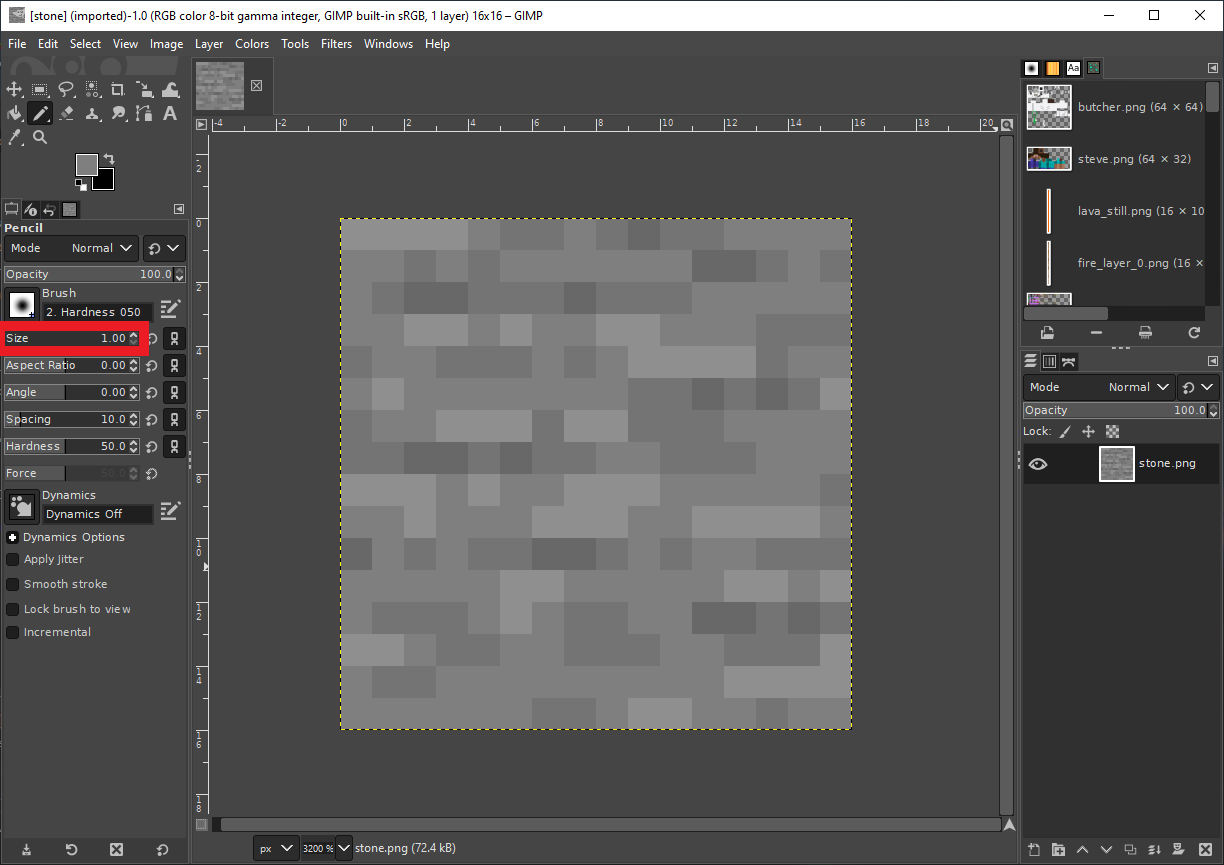
Now it's time to make your texture. If you're reusing the existing colors in the texture, hold down Ctrl and click the color in the image you want to use. This will make it the active color.
Use the colors in the texture and make a new texture you like. This may take a while and several attempts, but don't give up. Making textures can be hard, but I know you can do it!
Here is what I came up with for stone:
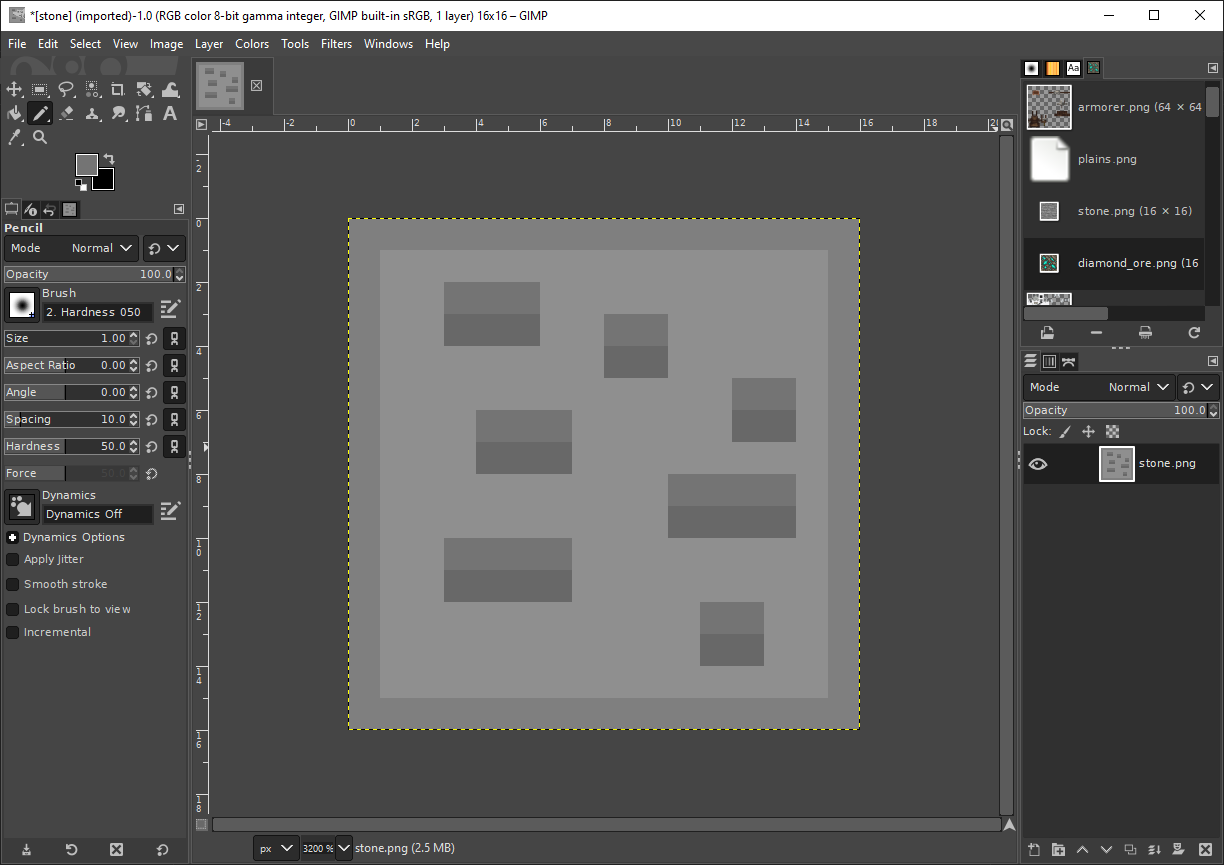
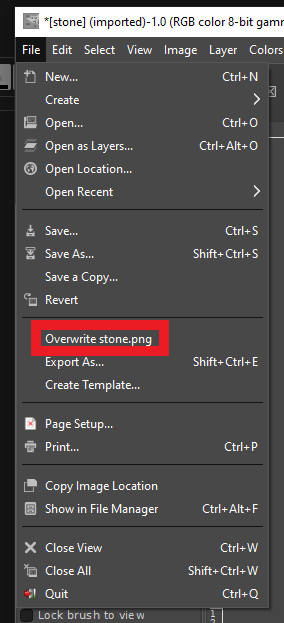
Once you are happy with the texture you have made you are going to want to export it. Hit the file menu button and click Overwrite stone.png:
Seeing Your Texture In-Game:
Once your texture has finished exporting, open up Minecraft and go to the resource packs menu, find your pack on the left, and click the arrow to move it to the active side:
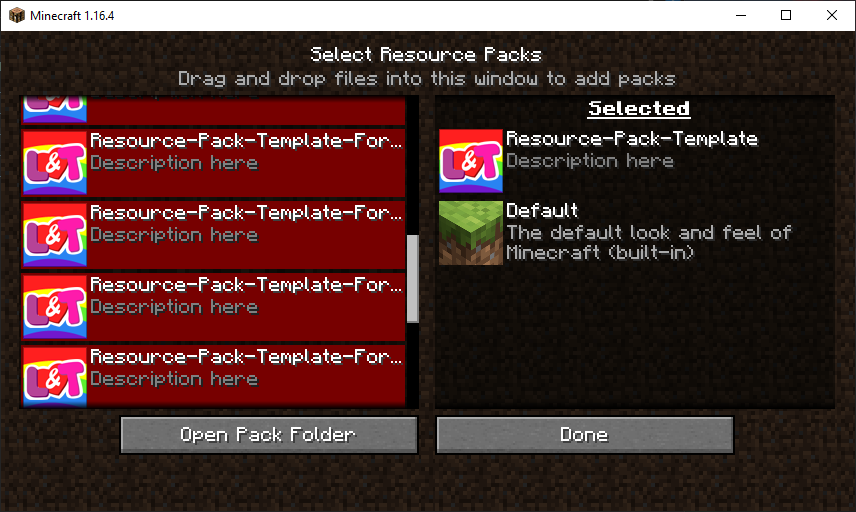
Now hit done and wait for it to reload resources. Once back at the menu, create a new world and go see your texture in game:
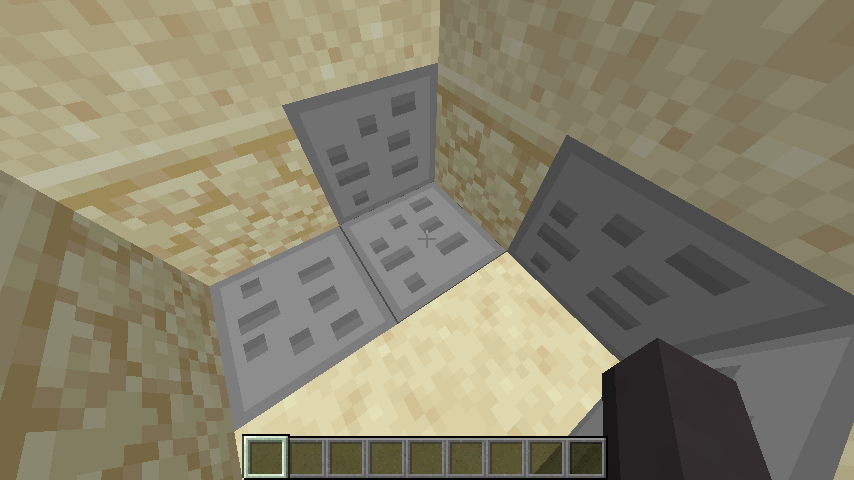
(The above texture has been made for demonstration purposes only; it is not used in any packs. It is loosely based on the stone in “Love & Tolerance”.)
Texture Animation
Any block or item texture in Minecraft can be animated. Let’s take a look at one from default Minecraft, to see how they work. Pictured below is sealantern.png:

As you can see, it looks like it has 5 textures stacked on top each other. These are actually the frames of the animation on the block.
Each block or item with animated textures must have a .mcmeta file to work. It is very important this file is named correctly and includes the .png in the filename. Pictured below is the sealantern.png.mcmeta file:
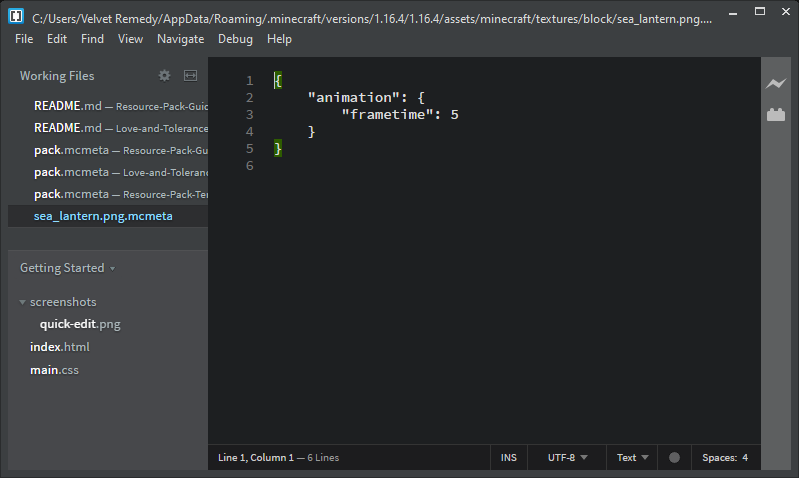
The frametime parameter above, tells Minecraft to hold each frame for 5 in-game ticks before going to the next one.
By default, Minecraft will play these in order. If you wanted to play them out of order, you would use the frames parameter, as shown below:
{
  "animation": {
    "frametime": 8,
    "interpolate": true,
    "frames": [
      0,
      1,
      2
    ]
  }
}
In the code above, the 0, 1, and 2 are the frames, and can be placed in any order. They can even repeat.
Some key things to remember is Minecraft starts with a 0 when counting frames, and the last item in a list does not need the comma , at the end.
The interpolate parameter, if true, means Minecraft will generate frames in between the frames of the image if the frametime is more than 1 between those frames.
There are two more parameters you can use in conjunction with the frames parameter; index, and time.
Index refers to which frame of the texture you are specifying and time refers to how long to hold that frame in game ticks.
Now that we have a general idea of how animated textures work, let's make one. I’m going to be making an animated texture for glowstone. Here is the texture I am going to animate:
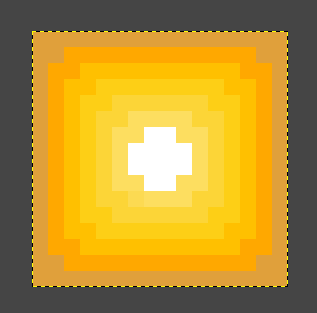
As you can see, right now it is just a regular texture. To make it animated, we need to increase the height proportional to the number of frames we want. I want to add 5 frames, and the current height is 16 pixels. 16 x 6 is 96. Remember to include the original frame in your calculation. In GIMP, click the image button, then click canvas size:

A window will pop up like this:
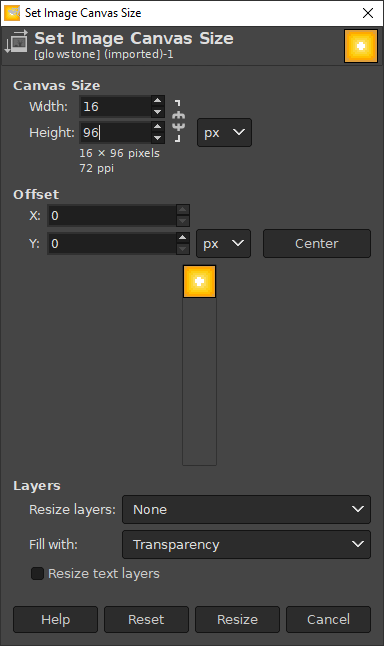
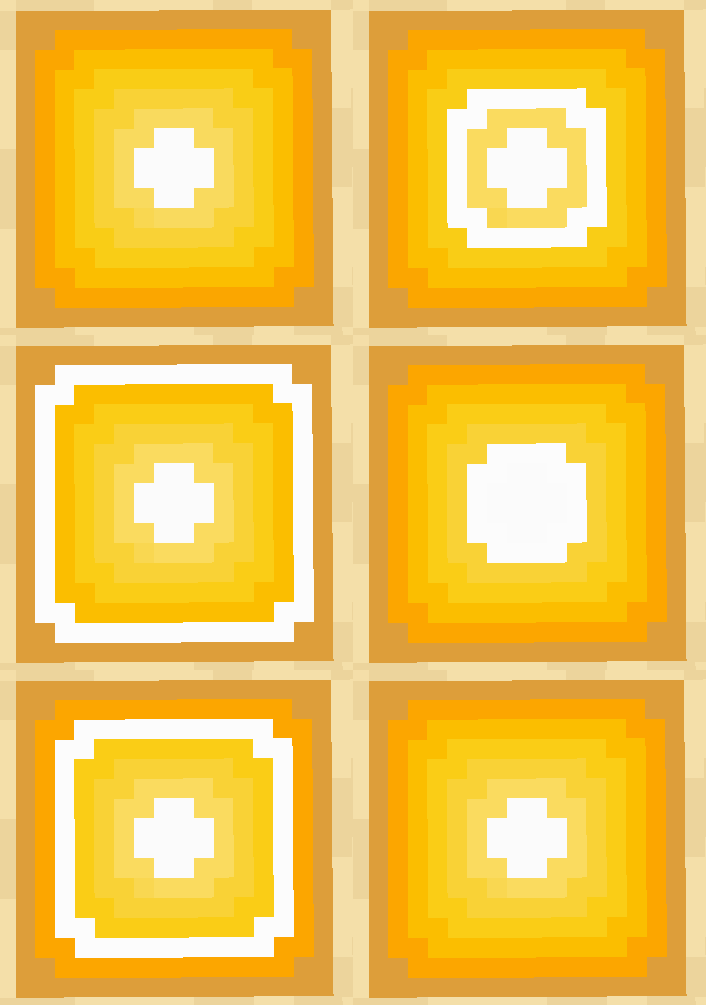
Set this to what you calculated earlier; I will use 96. After it changes, you will notice some blank space under the original texture. Hit Ctrl + C, then Ctrl + V to copy and paste the original texture. Use the move tool, and move them so they are stacked on top each other, like this:

Now, you need to make your edits to make it animated. I will make a simple expanding ring for demonstration:

After you make your texture, save it, and copy it to your resource pack. In the same folder, create a new file, and name it, glowstone.png.mcmeta. After that, open it up. It should be blank. We need to tell minecraft this is an animation. Start by typing:
{
  "animation": {
  }
}
We are going to want to add some parameters to this to make it work the way we want. I'm going to add the frametime and frames parameters, like this:
{
  "animation": {
    "frametime": 2,
    "frames": [
      0,
      1,
      2,
      3,
      4,
      5
    ]
  }
}
I don't want it to constantly repeat. I want it to hold on the first frame for a bit, I’ll do this by adding the index and time parameters to the first frame in the frames parameter like this:
{
  "animation": {
    "frametime": 2,
    "frames": [
      {
        "index": 0,
        "time": 10
      },
      1,
      2,
      3,
      4,
      5
    ]
  }
}
Now save the file and go into Minecraft to see how it turned out:
Works great, yay!
Resolution
Resource packs come in a wide variety of resolutions, but what does resolution mean?
Resolution refers to the width and height in pixels of the textures in your pack, usually measured by the resolution of block textures.
Default Minecraft uses a resolution of 16 pixels by 16 pixels. Your resource pack can be any "power-of-two" resolution you want, from 1x1 all the way to 1024x1024. (The powers of two are: 1, 2, 4, 8, 16, 32 etc.)
For best performance, it is generally advised to use 256x256 or smaller.
Changing Models
Coming Soon.™
Blockstates
Different Looks for Different Cases
Some blocks can use different textures or models depending on their in-game block state. The simplest and most common alternative state is rotation, such as how dispensers look different depending on their orientation. Other common blockstates include on or off, full or empty, growth level, connected or disconnected, etc. It can be useful to understand these blockstates if you want to change the way a block with multiple states will look.
Some blocks have multiple states, but look the same in the vanilla resource pack. That doesn’t mean they have to in yours! For example, you could make a pack wherein beehives look different depending on how much honey they contain, or wherein saplings get bigger when they are half-way to growing into a tree!
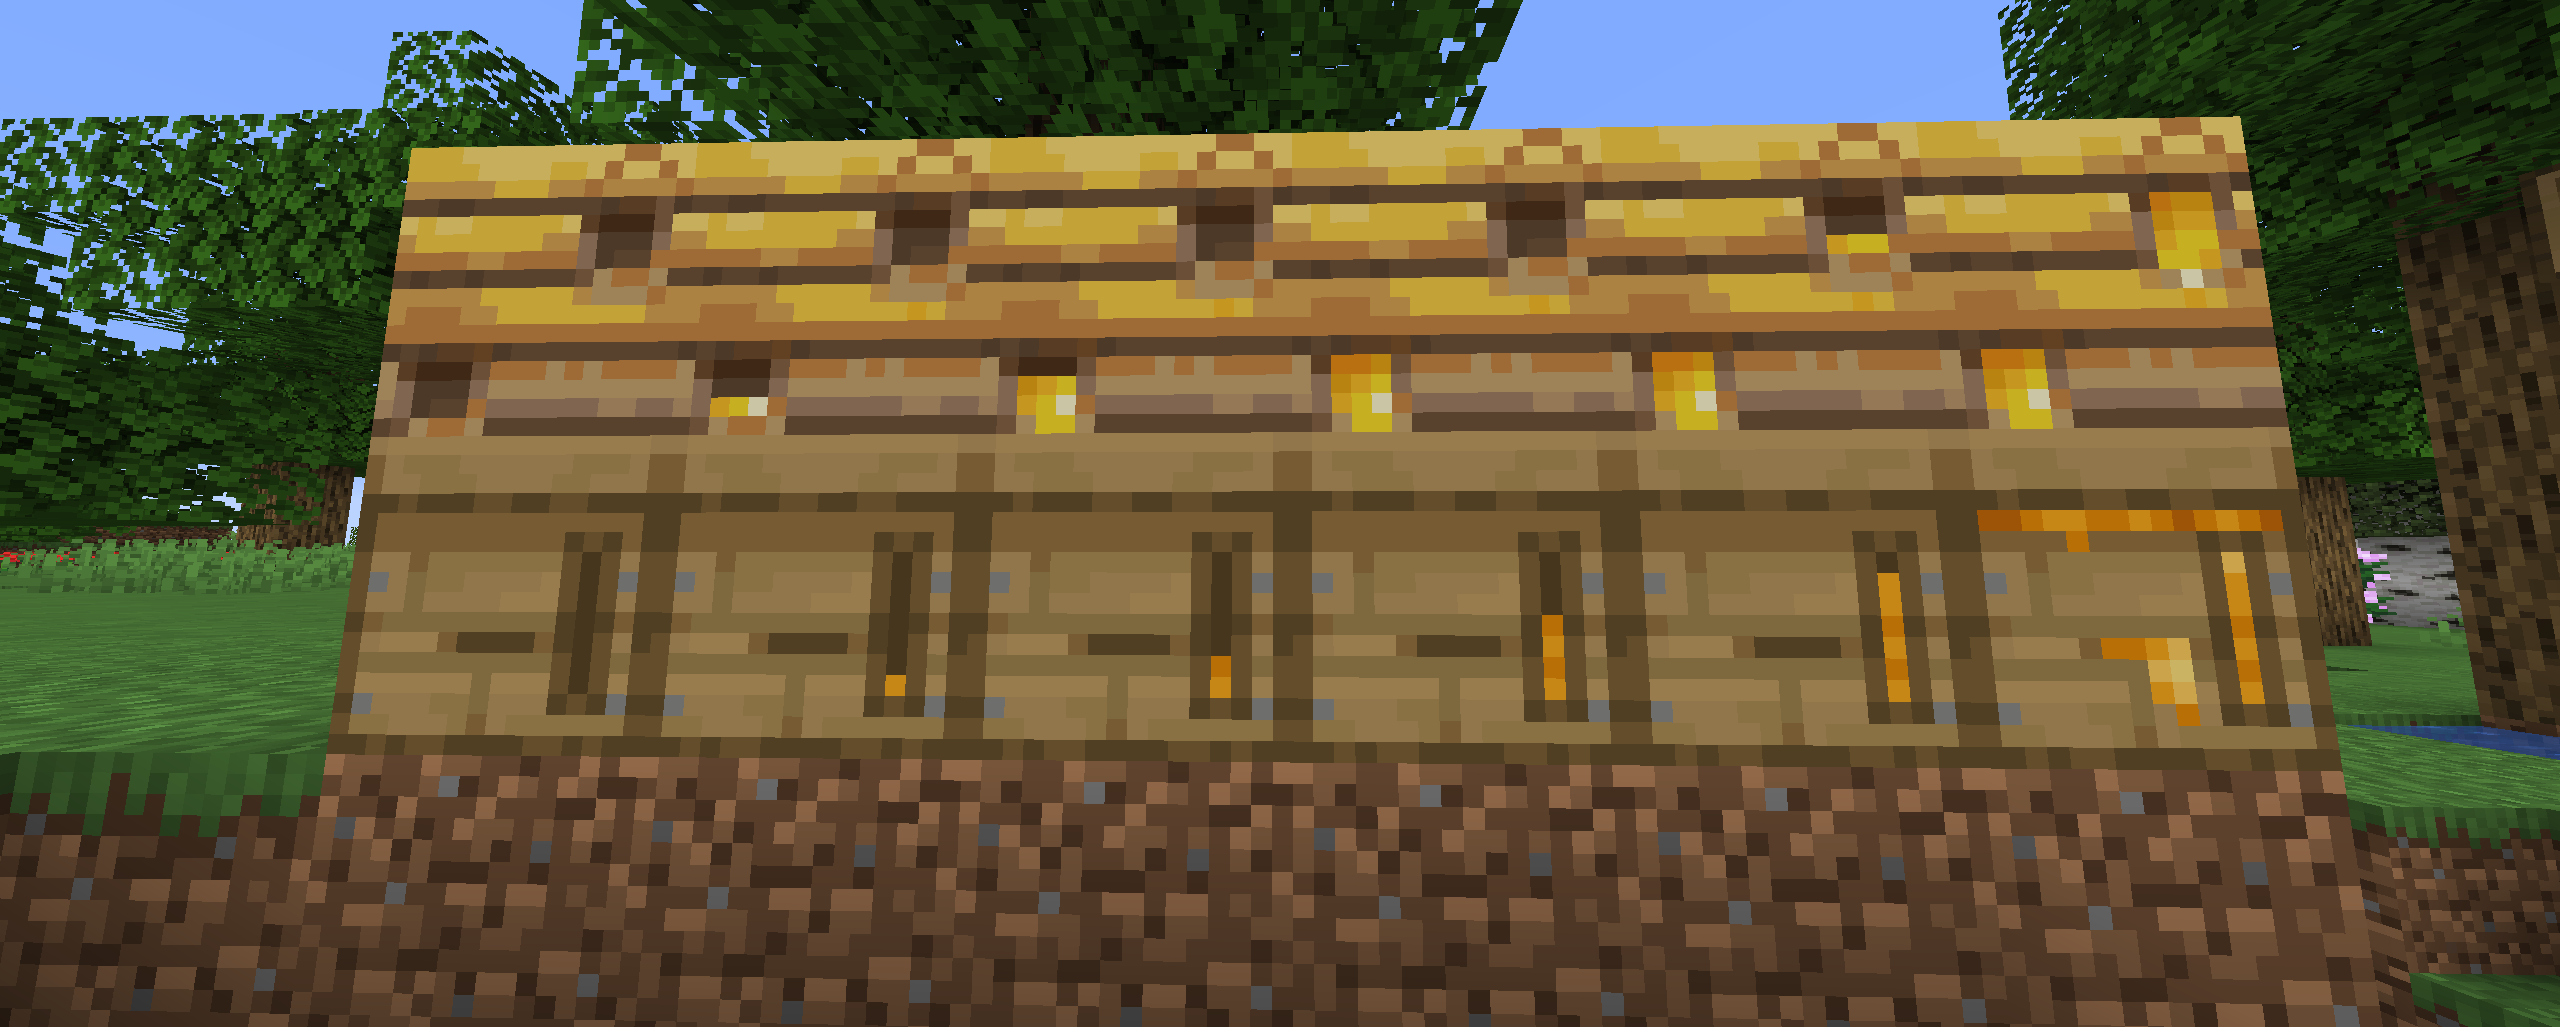
In this example we are going to make beehives show their exact honey level, rather than just full or not like in vanilla.
By default, beehives have two models. One used by completely full hives, and the other by empty, or partially full hives. The game knows which model to use by referencing the beehive.json blockstate file in the assets/minecraft/blockstates folder.
By default, this file looks like this:
{
  "variants": {
    "facing=east,honey_level=0": {
      "y": 90,
      "model": "minecraft:block/beehive"
    },
    "facing=east,honey_level=1": {
      "y": 90,
      "model": "minecraft:block/beehive"
    },
    "facing=east,honey_level=2": {
      "y": 90,
      "model": "minecraft:block/beehive"
    },
    "facing=east,honey_level=3": {
      "y": 90,
      "model": "minecraft:block/beehive"
    },
    "facing=east,honey_level=4": {
      "y": 90,
      "model": "minecraft:block/beehive"
    },
    "facing=east,honey_level=5": {
      "y": 90,
      "model": "minecraft:block/beehive_honey"
    },
    "facing=north,honey_level=0": {
      "model": "minecraft:block/beehive"
    },
    "facing=north,honey_level=1": {
      "model": "minecraft:block/beehive"
    },
    "facing=north,honey_level=2": {
      "model": "minecraft:block/beehive"
    },
    "facing=north,honey_level=3": {
      "model": "minecraft:block/beehive"
    },
    "facing=north,honey_level=4": {
      "model": "minecraft:block/beehive"
    },
    "facing=north,honey_level=5": {
      "model": "minecraft:block/beehive_honey"
    },
    "facing=south,honey_level=0": {
      "y": 180,
      "model": "minecraft:block/beehive"
    },
    "facing=south,honey_level=1": {
      "y": 180,
      "model": "minecraft:block/beehive"
    },
    "facing=south,honey_level=2": {
      "y": 180,
      "model": "minecraft:block/beehive"
    },
    "facing=south,honey_level=3": {
      "y": 180,
      "model": "minecraft:block/beehive"
    },
    "facing=south,honey_level=4": {
      "y": 180,
      "model": "minecraft:block/beehive"
    },
    "facing=south,honey_level=5": {
      "y": 180,
      "model": "minecraft:block/beehive_honey"
    },
    "facing=west,honey_level=0": {
      "y": 270,
      "model": "minecraft:block/beehive"
    },
    "facing=west,honey_level=1": {
      "y": 270,
      "model": "minecraft:block/beehive"
    },
    "facing=west,honey_level=2": {
      "y": 270,
      "model": "minecraft:block/beehive"
    },
    "facing=west,honey_level=3": {
      "y": 270,
      "model": "minecraft:block/beehive"
    },
    "facing=west,honey_level=4": {
      "y": 270,
      "model": "minecraft:block/beehive"
    },
    "facing=west,honey_level=5": {
      "y": 270,
      "model": "minecraft:block/beehive_honey"
    }
  }
}
Each variant in this list refers to one model for the game to use. But wait; didn’t I say there were only two? Well if you look carefully, four of these entries actually refer to the same model beehive_honey, which is the model full of honey. They simply instruct the game to rotate the block based on its facing. For example:
"facing = west,honey_level=5"means “if the block is facing west, and has 5 levels of honey”."Model": "minecraft:block/beehive_honey"means use thebeehive_honey.jsonmodel file fromassets/minecraft/block."Y": 270means rotate that model 270 degrees around the vertical axis.
The other 20 all refer to the beehive model, in each combination of honey level and rotation.
To tell the game to use a different model for each honey level, all we have to do, is make new models and textures for each case, (see sections above for more detail) and refer to those models accordingly. My recommendation would be to simply copy the existing beehive_honey.json model file and beehive_front_honey.png 4 times each, and rename those copies beehive_1.json through beehive_4.json, and beehive_front_1.png through beehive_front_4.png. In each of these model files, simply edit the honey texture references to the appropriate number, and edit your texture files to look however you want. These are the ones I used:

(Note: I also edited the empty and full textures to better match my new style.)
Finally, change the appropriate lines in the blockstate file to refer to your new model filenames. Your assets/minecraft/blockstates/beehive.json file should end up looking something like this:
{
  "variants": {
    "facing=east,honey_level=0": {
      "y": 90,
      "model": "minecraft:block/beehive"
    },
    "facing=east,honey_level=1": {
      "y": 90,
      "model": "minecraft:block/beehive_1"
    },
    "facing=east,honey_level=2": {
      "y": 90,
      "model": "minecraft:block/beehive_2"
    },
    "facing=east,honey_level=3": {
      "y": 90,
      "model": "minecraft:block/beehive_3"
    },
    "facing=east,honey_level=4": {
      "y": 90,
      "model": "minecraft:block/beehive_4"
    },
    "facing=east,honey_level=5": {
      "y": 90,
      "model": "minecraft:block/beehive_honey_5"
    },
    "facing=north,honey_level=0": {
      "model": "minecraft:block/beehive"
    },
    "facing=north,honey_level=1": {
      "model": "minecraft:block/beehive_1"
    },
    "facing=north,honey_level=2": {
      "model": "minecraft:block/beehive_2"
    },
    "facing=north,honey_level=3": {
      "model": "minecraft:block/beehive_3"
    },
    "facing=north,honey_level=4": {
      "model": "minecraft:block/beehive_4"
    },
    "facing=north,honey_level=5": {
      "model": "minecraft:block/beehive_honey"
    },
    "facing=south,honey_level=0": {
      "y": 180,
      "model": "minecraft:block/beehive"
    },
    "facing=south,honey_level=1": {
      "y": 180,
      "model": "minecraft:block/beehive_1"
    },
    "facing=south,honey_level=2": {
      "y": 180,
      "model": "minecraft:block/beehive_2"
    },
    "facing=south,honey_level=3": {
      "y": 180,
      "model": "minecraft:block/beehive_3"
    },
    "facing=south,honey_level=4": {
      "y": 180,
      "model": "minecraft:block/beehive_4"
    },
    "facing=south,honey_level=5": {
      "y": 180,
      "model": "minecraft:block/beehive_honey"
    },
    "facing=west,honey_level=0": {
      "y": 270,
      "model": "minecraft:block/beehive"
    },
    "facing=west,honey_level=1": {
      "y": 270,
      "model": "minecraft:block/beehive_1"
    },
    "facing=west,honey_level=2": {
      "y": 270,
      "model": "minecraft:block/beehive_2"
    },
    "facing=west,honey_level=3": {
      "y": 270,
      "model": "minecraft:block/beehive_3"
    },
    "facing=west,honey_level=4": {
      "y": 270,
      "model": "minecraft:block/beehive_4"
    },
    "facing=west,honey_level=5": {
      "y": 270,
      "model": "minecraft:block/beehive_honey"
    }
  }
}
Once done, go in game and see how it looks:
Variant Textures
Minecraft supports the ability to have more than one model for a single block. With this we can make it so blocks have variant textures, to make the world look more alive.
To do this we are going to need a few things. First we are going to need a texture for each variant you plan to have. Here are the textures I will be using:

As you can see above, I have 6 diamond ore textures. The first one is named exactly like default and the rest have a _2, _3, _4, _5, _6 after. You will want to copy these textures into your block folder in your resource pack.
Once we have done that, we are going to need to get the blockstate file for diamond ore. Go into your extracted minecraft .jar folder, go into the blockstates folder, and copy the blockstate for the block you want to use.
Go into your resource pack, into the minecraft folder, and make a folder called blockstate. Then, go into it and paste the blockstate you copied earlier. Now, right-click the blockstate and open it in brackets. This is how it looks:
{
  "variants": {
    "": {
      "model": "minecraft:block/diamond_ore"
    }
  }
}
As you can see there is only 1 variant at the moment. We want to add 5 more. We do this by adding more models like this:
{
  "variants": {
    "": [
    { "model": "minecraft:block/diamond_ore" },
    { "model": "minecraft:block/diamond_ore_2" },
    { "model": "minecraft:block/diamond_ore_3" },
    { "model": "minecraft:block/diamond_ore_4" },
    { "model": "minecraft:block/diamond_ore_5" },
    { "model": "minecraft:block/diamond_ore_6" }
    ]
  }
}
To add a list in JSON, you need to use [ to start it and ] to end it. Notice where we place these in the file: after the : that tells minecraft the state to apply these models to, and at the end of the list.
The last step is to make the model files. Start by going into the default minecraft models folder, go into blocks, and find diamond_ore.json. Copy it, and place it in the same folder in your pack /assets/minecraft/models/block. Once copied there, you will want to make a copy of it for each variant that you want. Rename these to what you put in the blockstates file:
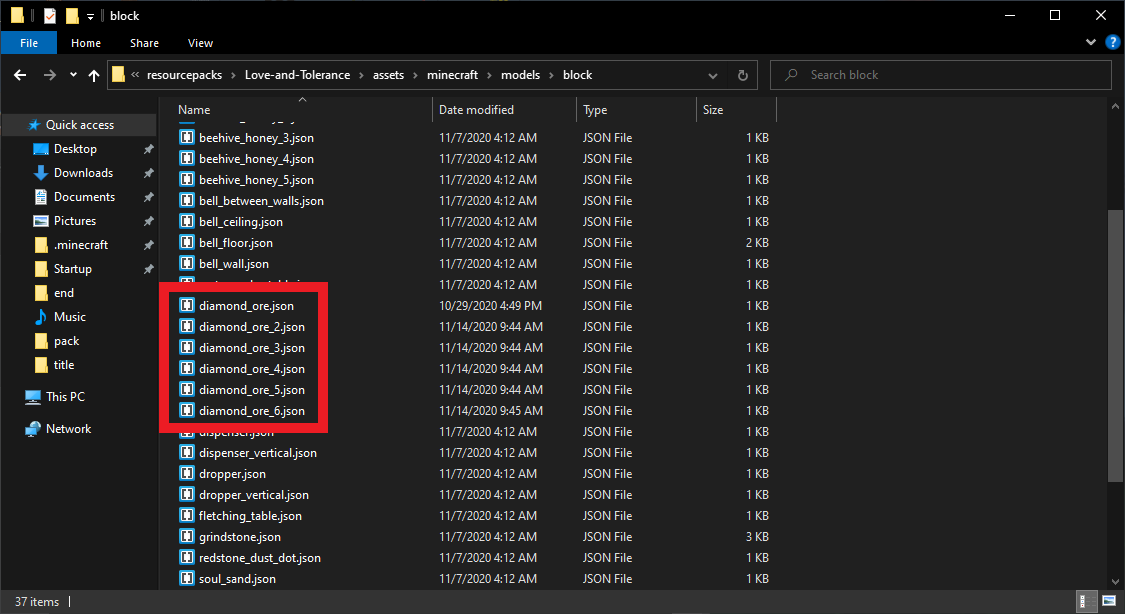
Now, you are going to want to open each model, and edit it to point to the correct texture, like this:
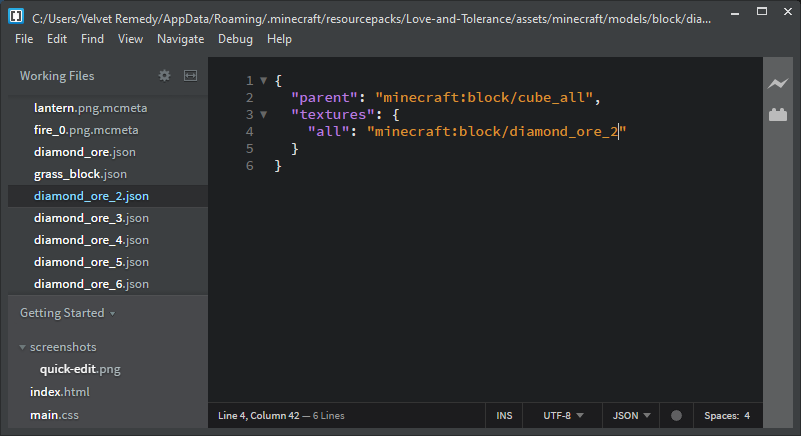
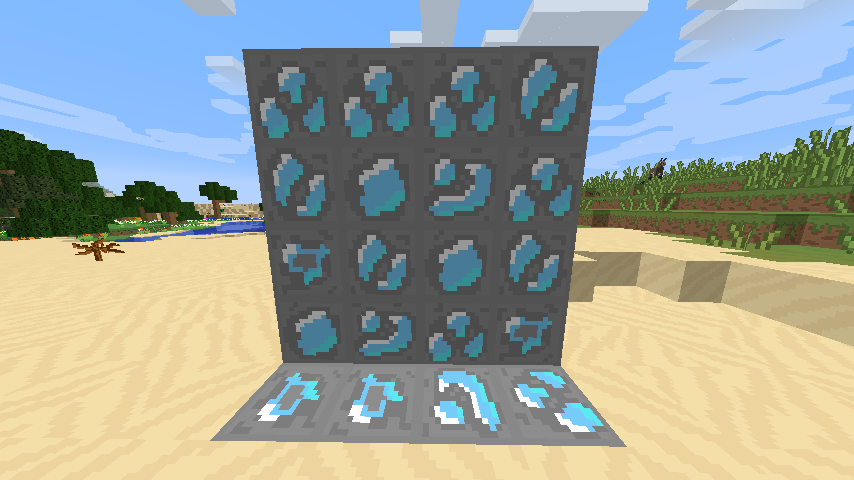
Once you have done that for all of them, we can go in game and try it out. Here are my results:
Weighted Variants
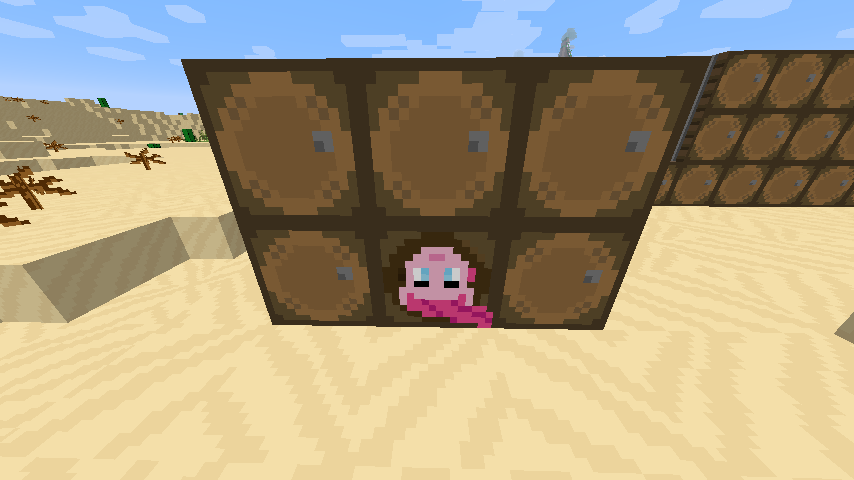
Blockstates also can support weighted variants, meaning we can create scarcity in our variant textures. A fun idea for this, is to hide stuff inside the barrel. We are going to be hiding a pink pony inside 15% of the barrels when they are open.
You're going to want to start off again, by having textures already made:

As you can see, I have 2 barrel open textures. One is normal and one has a little surprise in it. We are going to want to copy these to our block textures folder.
After that, you will want to copy the default blockstate file for the barrel into the blockstate folder for your pack. Opening it up, we see that it is rather long:
{
  "variants": {
    "facing=down,open=false": {
      "x": 180,
      "model": "minecraft:block/barrel"
    },
    "facing=down,open=true": {
      "x": 180,
      "model": "minecraft:block/barrel_open"
    },
    "facing=east,open=false": {
      "x": 90,
      "y": 90,
      "model": "minecraft:block/barrel"
    },
    "facing=east,open=true": {
      "x": 90,
      "y": 90,
      "model": "minecraft:block/barrel_open"
    },
    "facing=north,open=false": {
      "x": 90,
      "model": "minecraft:block/barrel"
    },
    "facing=north,open=true": {
      "x": 90,
      "model": "minecraft:block/barrel_open"
    },
    "facing=south,open=false": {
      "x": 90,
      "y": 180,
      "model": "minecraft:block/barrel"
    },
    "facing=south,open=true": {
      "x": 90,
      "y": 180,
      "model": "minecraft:block/barrel_open"
    },
    "facing=up,open=false": {
      "model": "minecraft:block/barrel"
    },
    "facing=up,open=true": {
      "model": "minecraft:block/barrel_open"
    },
    "facing=west,open=false": {
      "x": 90,
      "y": 270,
      "model": "minecraft:block/barrel"
    },
    "facing=west,open=true": {
      "x": 90,
      "y": 270,
      "model": "minecraft:block/barrel_open"
    }
  }
}
The barrel has quite a lot going on in its blockstate, but don't be intimidated by how complex it looks; it's easy to understand. The facing parameter refers to the direction the front or top of the block is facing. In this case, the barrel is directed by the top side. The x and y parameters refer to the rotation of the model on that axis, when facing that direction. The open parameter refers to whether the barrel is being used by a player. If true it switches to an open-top texture. Lastly, the model parameter refers to the model it will use in that state.
Now we are going to want to add our variant. We are also going to want to add the weight parameter to each open barrel model. Start by making a list for each open barrel model, with [ right after open=true”: and place one at the end of the model, right after }. After you do this, copy the model and paste it below itself like this:
    "facing=down,open=true": [ {
      "x": 180,
      "model": "minecraft:block/barrel_open"
    },
      {
      "x": 180,
      "model": "minecraft:block/barrel_open"
    } ],
Let’s fix the formatting a bit, by moving the close of the first model, and open of the second to the same line. Also, let’s change the second model to be our variant, like this:
    "facing=down,open=true": [ {
      "x": 180,
      "model": "minecraft:block/barrel_open"
    }, {
      "x": 180,
      "model": "minecraft:block/barrel_open_ponk"
    } ],
Now let’s add our weight. Do this by adding a comma , after the model, and putting “weight”: 85 for the top model, and weight”: 15 for the second model, like this:
    "facing=down,open=true": [ {
      "x": 180,
      "model": "minecraft:block/barrel_open",
      "weight": 85
    }, {
      "x": 180,
      "model": "minecraft:block/barrel_open_ponk",
      "weight": 15
    } ],
Do this same process for all the open barrel variants. When done, it should look like this:
{
  "variants": {
    "facing=down,open=false": {
      "x": 180,
      "model": "minecraft:block/barrel"
    },
    "facing=down,open=true": [ {
      "x": 180,
      "model": "minecraft:block/barrel_open",
      "weight": 85
    }, {
      "x": 180,
      "model": "minecraft:block/barrel_open_ponk",
      "weight": 15
    } ],
    "facing=east,open=false": {
      "x": 90,
      "y": 90,
      "model": "minecraft:block/barrel"
    },
    "facing=east,open=true": [ {
      "x": 90,
      "y": 90,
      "model": "minecraft:block/barrel_open",
      "weight": 85
    }, {
      "x": 90,
      "y": 90,
      "model": "minecraft:block/barrel_open_ponk",
      "weight": 15
    } ],
    "facing=north,open=false": {
      "x": 90,
      "model": "minecraft:block/barrel"
    },
    "facing=north,open=true": [ {
      "x": 90,
      "model": "minecraft:block/barrel_open",
      "weight": 85
    }, {
      "x": 90,
      "model": "minecraft:block/barrel_open_ponk",
      "weight": 15
    } ],
    "facing=south,open=false": {
      "x": 90,
      "y": 180,
      "model": "minecraft:block/barrel"
    },
    "facing=south,open=true": [ {
      "x": 90,
      "y": 180,
      "model": "minecraft:block/barrel_open",
      "weight": 85
    }, {
      "x": 90,
      "y": 180,
      "model": "minecraft:block/barrel_open_ponk",
      "weight": 15
    } ],
    "facing=up,open=false": {
      "model": "minecraft:block/barrel"
    },
    "facing=up,open=true": [ {
      "model": "minecraft:block/barrel_open",
      "weight": 85
    }, {
      "model": "minecraft:block/barrel_open_ponk",
      "weight": 15
    } ],
    "facing=west,open=false": {
      "x": 90,
      "y": 270,
      "model": "minecraft:block/barrel"
    },
    "facing=west,open=true": [ {
      "x": 90,
      "y": 270,
      "model": "minecraft:block/barrel_open",
      "weight": 85
    }, {
      "x": 90,
      "y": 270,
      "model": "minecraft:block/barrel_open_ponk",
      "weight": 15
    } ]
  }
}
After you are done with the blockstate file, you are going to want to copy both default barrel models from minecraft, into your resource pack. Make a copy of the barrel open model and change its name to barrel_open_ponk.json. After that, edit the file to point to the barrel_open_ponk.png texture. Save this file, then you are done.
Once you are done with everything, it's time to go test it in game. Here is what the barrels look like closed:
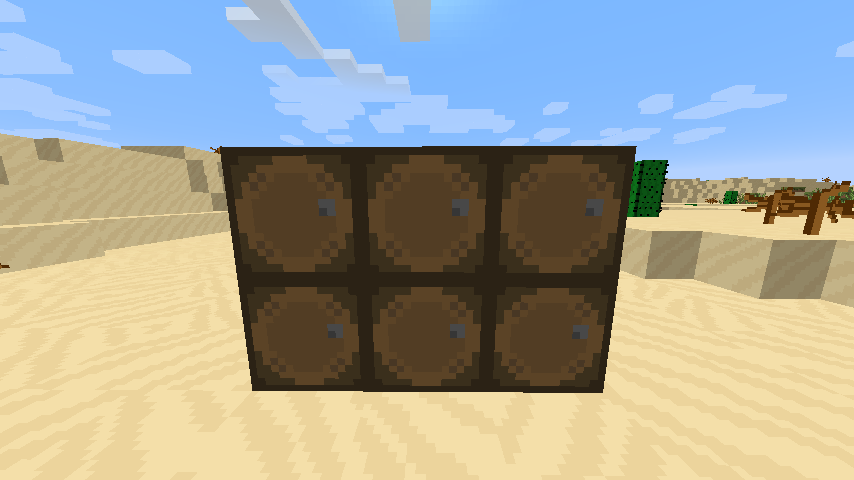
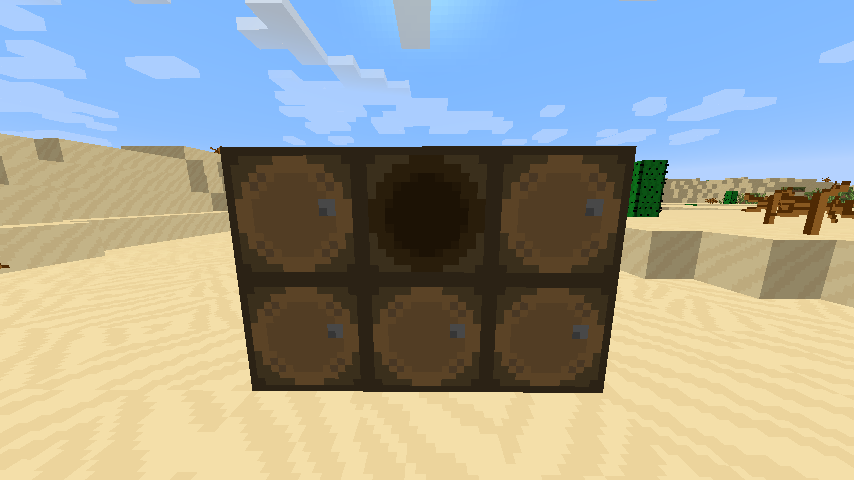
Here is what most of them look like when they are opened:
Here is what is hiding inside 15% of them:
Plant Color
Most grass and foliage in Minecraft derive its color from one of two colormaps called grass.png for grass and foliage.png for foliage, we can edit these to change how grass looks in our world.
Here is a template made by Word_Wizard:
As the template says it is pixel perfect, we are going to use it to adjust our own colors for the grass and foliage. Download the template (Download). Now go into your extracted jar and go into the colormaps folder /assets/minecraft/textures/colormaps/. Inside you will see 2 files, this template works on both, so I will only be covering how to do this on one, you can repeat this for the other.
Unchangeable plant and foliage colors:
Some plant colors can't be changed in default minecraft, to do that you will need to use Optifine.
Here is a list of everything that you need Optifine to change:
GUI
More Coming Soon.™
Making a title screen panorama (WIP)
Making a panorama is pretty easy. To get started, you are going to want to find the spot in the world you want to use. I will be using this spot:
Once you find your spot, you will want to close the game and relaunch the launcher. Then go to the installations tab
Find the installation you want to use and click on the 3 dots to the right. Click edit. At the bottom of the screen that pops up, will be “Resolution”. You will want to set this to a square resolution; I recommend 1024 if your monitor supports it:
Once you have it set, hit save, then go back to the play tab and launch the installation you edited. When you get to the menu, you will want to go to options. At the top, you will need to set your FOV: to 90. After this, go into the world you want to use for your panorama. In the chat, type this command:
/tp @p ~ ~ ~ 0 0
This will center you perfectly on the block. Press F1 to hide your UI and then F2 to take a screenshot. Do this 5 more times after running each of these commands:
/tp @p ~ ~ ~ 90 0
/tp @p ~ ~ ~ 180 0
/tp @p ~ ~ ~ 270 0
/tp @p ~ ~ ~ 0 -90
/tp @p ~ ~ ~ 0 90
Once you have all 6 screenshots done, you will want to move them into this folder on your resource pack: /assets/minecraft/textures/gui/title/background Like this:
Now you will want to rename them like this:
Start with panorma_0 and go to _5.
Entities
Coming Soon.™
Other Visuals
Particles, Icons, Environmental Textures and various other visual effects can be edited in the same way as the other textures, but advanced changes, such as to resolution variation, models, animation etc are generally not supported in the vanilla game (see Optifine below). Paintings can also be altered, including adjusting their resolution.
Debugging
Common Problems
Pack Missing from Menu
Make sure your folder structure is accurate. In particular:
- Ensure the folder structure is as follows:
.minecraft/resourcepacks/packName/pack.mcmeta - Ensure the pack.mcmeta file is correctly formatted
- Ensure you have file-extensions shown, and it is not actually
pack.mcmeta.txt - Check the output log (see below) to see if there’s another problem preventing the back from loading.
Pack Listed as Out of Date
Ensure your pack.mcmeta file lists the latest “pack_format”. (Mojang simply changes this number any time they change something that might break old packs, so players know which packs might not work anymore. The change might not actually apply to your pack.)
Changes are Missing
If one or more of your changes hasn’t taken effect, an error in the output log (see below) may solve your problem. If no relevant errors are listed there, make sure the relevant files are named appropriately, and in the right places.
Purple and Black Texture
This is the default texture the game uses when it knows it’s supposed to use a custom texture, but gets confused. The good news is, if you see this error, you can guarantee the output log (see below) will have some information to help.
Animated textures not working/look weird
All animated textures in Minecraft need a .mcmeta file for them to work. Make sure you have one, that it is formatted correctly and that the filename includes the exact name of the texture you want to animate, including the .png.
The Output Log
The output log is a handy little window which tracks a wide variety of things, mostly useful for debugging purposes. If you load your resource pack, and something isn’t working right, there’s a good chance the output log will tell you why, or at least narrow down the options.
Activating the Output Log
- In the Minecraft launcher, go to settings in the bottom left.
- Check
Open output log when minecraft starts.
This will run a little window in the background, which keeps track of some things. You're looking for yellow or red text in the log, either when the game is launching, or when the resource pack is reloaded (reload your active resource packs with F3+T, or by switching packs)
Interpreting the Output Log
The output log will be full of all sorts of stuff, but only a few lines will be useful for our purpose.
There are common error types that are valuable to debugging your resource pack:
File Not Found Exception:
This error means the game was looking for a particular file in your pack, but couldn’t find it. Usually it’s a simple fix.
This error will look something like this:
Unable to load model: 'minecraft:block/stone' referenced from: minecraft:stone#:
java.io.FileNotFoundException: minecraft:models/block/stone.json
This looks complicated, but is straightforward once you know what you’re looking at. Let’s break it down.
- “Unable to load model” means it’s the model file it couldn’t deal with, as opposed to a blockstate file or a texture file for example.
- “'minecraft:block/stone'” Tells us it’s the “stone” model that it couldn’t load
- “FileNotFoundException” tells us it couldn’t load the file because it couldn’t find it (for other exceptions, see the other sections of this guide)
- “minecraft:models/block/stone.json” tells you that it’s your “stone” model it had trouble finding, and that it expected to find it in the “block” folder, itself in the “models” folder
File not found exceptions are caused by two problems:
- The file is mistitled or in the wrong place
- You misspelled the name of the file when you referenced it elsewhere (such as referencing the model file-path in a blockstate file, or a texture file in a model file)
Malformed Json Exception:
Malformed exceptions are caused when there's a typo in the model file, it will try to tell you where that error is. It may look something like this:
Unable to load model: 'minecraft:block/stone' referenced from: minecraft:stone:
com.google.gson.JsonSyntaxException:
com.google.gson.stream.MalformedJsonException: Unterminated object at line
24 column 22 path $.elements[0].faces.north
This is more complicated to interpret than the file not found exception, but we can still break it down:
- “Unable to load model” means it’s the model file it couldn’t deal with, as opposed to a blockstate file for example.
- “'minecraft:block/stone'” tells us it’s the “stone” model that it couldn’t load
- “MalformedJsonException” tells us it couldn’t load the file because there was something inside it couldn’t understand (for other exceptions, see the other sections of this guide)
- “Line 24 column 22” tells us it thinks the problem is the 22nd character on line 24. It is quite likely however, that the problem is actually somewhere later. For example, if you open a ‘{‘ on line 24, but forget to close it with ‘}’ on line 45, it will still think the problem is line 24.
- “path $.elements[0].faces.north” This tells us what section it thinks is a problem. Usually, a typo will confuse where the sections start and end though, so rarely as helpful as the line number.
- It usually attempts to guess what kind of typo it was. Some examples below:
- “Unterminated object” or “java.io.EOFException: End of input at” means there’s something off about your parentheses, brackets, braces or commas. (Probably an extra or one missing)
- “Expected ‘:’ at” means basically what it says on the tin, but it could easily be confused. Check your nearby quotation marks if the problem isn’t otherwise obvious
- “Unknown facing: souh” this means you’ve made a typo in a variable name (in this case, “south” is a real facing, while “souh” (missing the ‘t’)is not.
Optifine
Coming Soon.™
Language Files
Minecraft is translated into over 120 languages. We can take advantage of this, by modifying the files the game references to do this.
These files are stored in assets/minecraft/lang, and are named in the format “en_us.json”, where the first two letters stand for the language, and the second two letters stand for the regional variant (in this case, American English). You do not need to make a file for every language, but be aware that players that use your pack in a language you have not altered, will not see your language changes. (A full list of supported languages can be found ____)
Each piece of text is called a “string”. Strings can be anything from a single character, like the Roman numeral “I” used as part of the potion tooltip, or entire paragraphs, like in some options screens. Each line of the .json file tells the game how to display one string.
Changing Text
Let’s say you are annoyed that oak trees drop apples, so you want to rename them to apple trees.
- Make a copy of the language file for each language you wish to support
- Delete every string that you don’t intend to change (every one that doesn’t reference “oak”), making sure to keep the “{“ and “}” at the ends of the file
- Change the text in the second set of parentheses as you see fit
- Ensure every string but the last has a comma after
So for our example,
"block.minecraft.oak_planks": "Oak Leaves",
becomes
"block.minecraft.oak_planks": "Apple Leaves",
“%s” and "%1$s” refer to variables such as a number or another string. The number after the percentage references the order. For example, we could change the string
"%1$s was blown up by %2$s"
(which might say “Cultist_O was blown up by Creeper”)
to
"%2$s blew %1$s up",
(which would instead say “Creeper blew Cultist_O up”)
Changing Text Color & Format
Sometimes you may want to change the color or format of text, for example, if you want to change the color of a GUI to something that would make light-grey text hard to read.
To do this, simply use the “§” symbol, followed by the number for the appropriate color or format. For example,
"container.inventory": "§9Inventory",
would result in the word “Inventory” appearing light blue, while
"enchantment.minecraft.luck_of_the_sea": "§2Luck§r of the §1§lSea",
would result in the word “Luck” being green, and “Sea” being both blue and bold.
Better examples including support for colored text can be found on the Minecraft Wiki Page for Formatting Codes
| Code | Color/Formatting |
|---|---|
| §0 | Black |
| §1 | Blue |
| §2 | Green |
| §3 | Cyan |
| §4 | Red |
| §5 | Magenta |
| §6 | Yellow |
| §7 | Gray |
| §8 | Dark Gray |
| §9 | Light Blue |
| §a | Light Green |
| §b | Light Cyan |
| §c | Light Red |
| §d | Light Magenta |
| §e | Light Yellow |
| §f | White |
--Non-Colored-- | --Format-- |
| §l | Bold |
| §m | Strikethrough |
| §n | Underline |
| §o | Italic |
| §r | Reset |
| §k | Obfuscated (Characters that cycle randomly) |
Things to Consider:
- Try not to make the text too long. It may not fit in the GUI properly, and look bad
- Some strings appear in several places. “Done” for example is used in several places.
- If you make a resource pack for a language with variants, (English for example) it’s often fairly easy to copy the language file and change the name to support variants. Canadian English for example (en_ca), only has a few strings that should be different from en_us.
Splash Texts:
- These are the yellow text that hovers next to the minecraft logo on the main menu. The game randomly pics a line from this list to show each time the menu is accessed.
End Poem & Credits
- These files are found in assets/minecraft/texts. Editing them should be fairly self-explanatory. Note that PLAYERNAME will be replaced with the player’s name in the end poem.
Sounds
Minecraft sound files do not show up when you use a normal archive extraction tool. We can use a specific program to extract them though. Linked above is a program made specifically to extract Minecraft's sounds. After they are extracted, you can see where to put sounds in your resource pack.
Minecraft uses .ogg files at 96kb/s for its sounds. If using Audacity to make your sound files, when exporting as OGG, use quality setting 3 if you want to match default minecraft kb/s.
Credits
- Initiative
- Most of the work
- Debugging & Output Log
- Language & Text Files
- Blockstates Part 1
- “Partially Filled Hives” Example Resource Pack & Textures
- Light Editing and Proofreading
- Proofreading
- Alternative image/text/model editor programs
- Light fact checking
- Reformatting tables
- Additional tables
- Additional editor programs